Well Happy Christmas, Happy New Year and any thing else that I’ve missed in the two months since I last posted a blog! I have, as always, been busy and have been using Facebook as a record of my modelling progress, posting almost daily. This is as much to keep up my own momentum as to show off what I have been doing. The purpose of this post is to pull together some of the Facebook posts but more importantly, to record some of the ideas and lessons that I have picked up whilst building my latest wargaming force.
My Unit of Victrix foot knight remind me of my Timpo toy soldiers!
One of my earliest memories of playing with toy soldiers was my collection of Britain’s Medieval Knights. They were simply superb models – far too good for children! They were also expensive, so I had supplemented my army with various other figures – Timpo and Crescent being the two that I recall. Some of those were in Crusader, or more specifically, Templar dress and I thought that they looked great! Of course, back in the sixties, Tales of Richard the Lion Heart, Robin Hood and Ivanhoe were on TV to inspire my play!
Rather than Ivanhoe, I have Balian D’Ibelin from Kingdom of Heaven to inspire me!
Fast forward to my late teens and I was beginning to get involved on the periphery of serious wargaming. I bought and painted a few Hinchliffe mounted crusaders with the steel lances. I thought that they looked superb in their white surcoats and red crosses, although I suspect that my painting may have improved since then – well I hope so! Unfortunately, my flirtation with historical Wargaming waned as I was seduced by Games Workshop, driven by my love of science fiction.
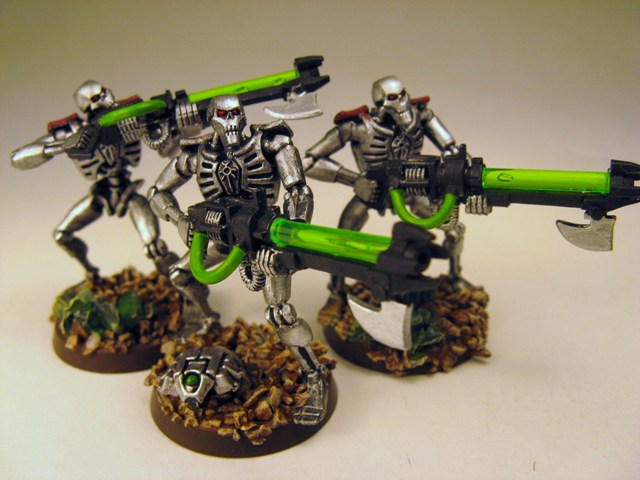
Not quite Knights in armour…Necrons!
Fast forward again, some thirty years or more and I am now obsessed with Historical Wargaming and my Games Workshop collection is gathering dust in my display cabinets! One of the joys of the GW, specifically, the 40K universe, was that one set of rules (albeit that they changed every three years or so) would let you explore and collect many different armies. With Historical rules it seemed from the outside that every period needed a new set of rules and a different basing and organisation system. Of course this wasn’t actually so – it just looked that way to me.
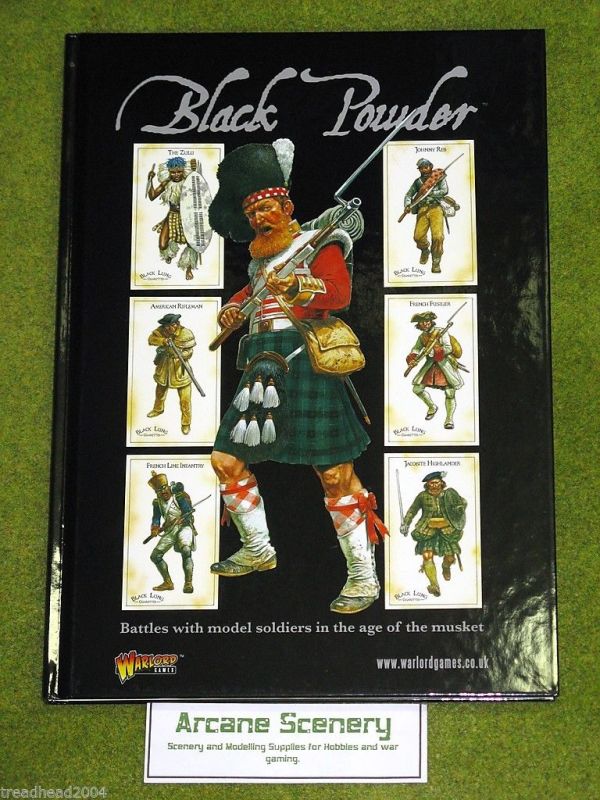
The rules set that changed my (wrongly assumed) impression was Black Powder. Although largely used to play Napoleonic games, It became clear through the various excellent supplements that the basic rules engine could be used for anything from the Romans (Hail Caesar) through to the American Civil War ( Glory Hallelujah!). Then came my involvement with Never Mind the Bill Hooks. Although primarily designed as a War of The Roses Rules set, it became obvious that the basic rules engine could be modified to comfortably accommodate all periods of warfare up the English Civil War, as well as Fantasy and even Medieval Naval warfare.
The forthcoming edition of Never Mind the Bill Hooks will feature some new periods and theatres of warfare. I have written a chapter for Samurai and have of course built the armies required to play the game. Also included will be a chapter on the crusades which gave me the incentive to recreate my childhood army of Crusaders. All of which is a very overlong introduction to why and how I am building my Crusader army.
My other unit of foot knights
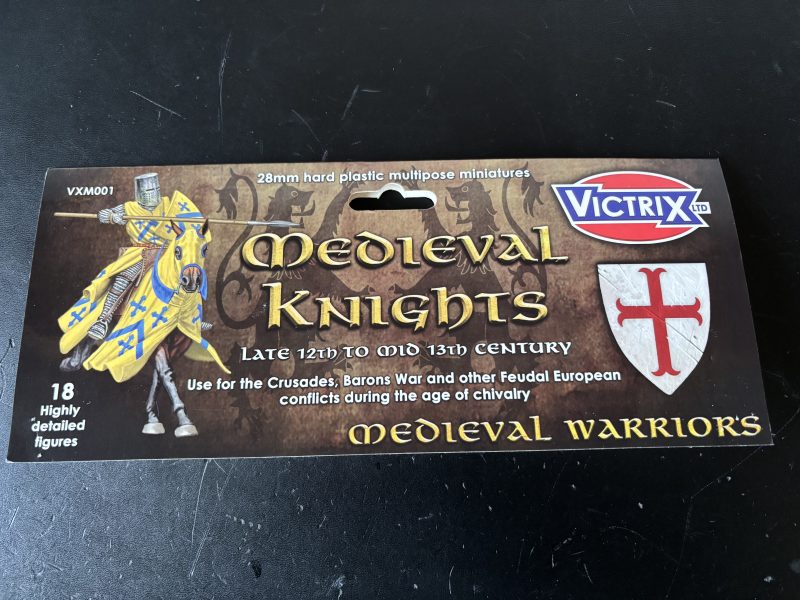
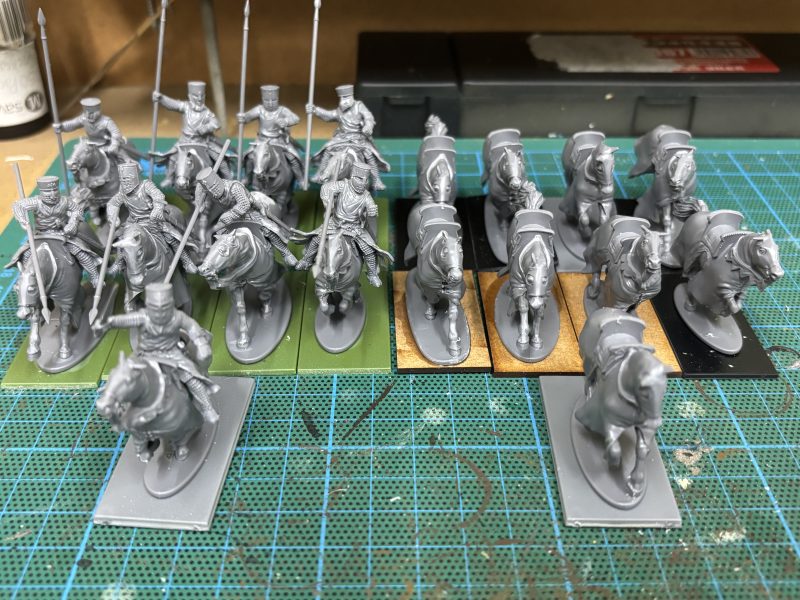
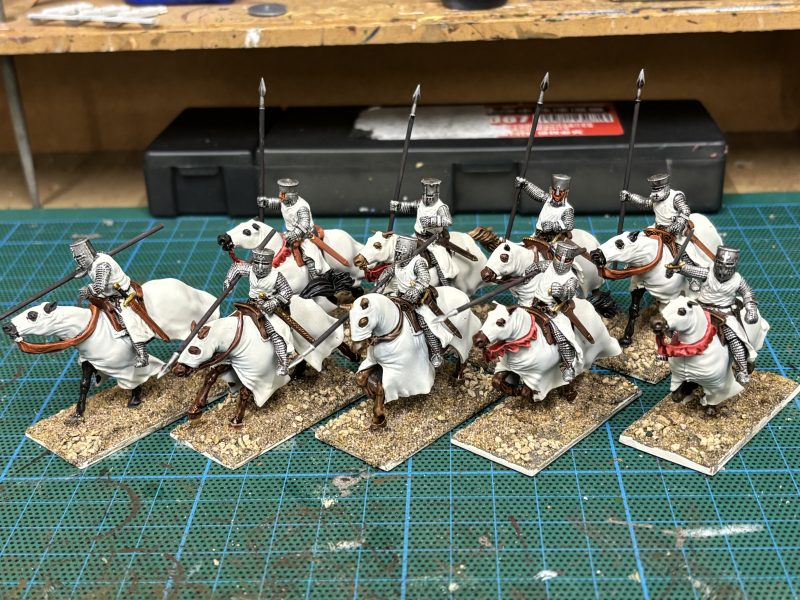
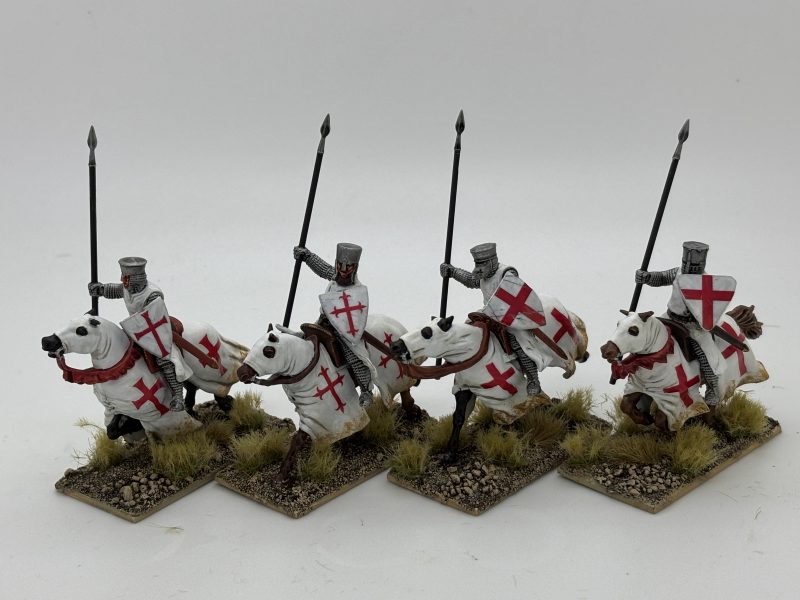
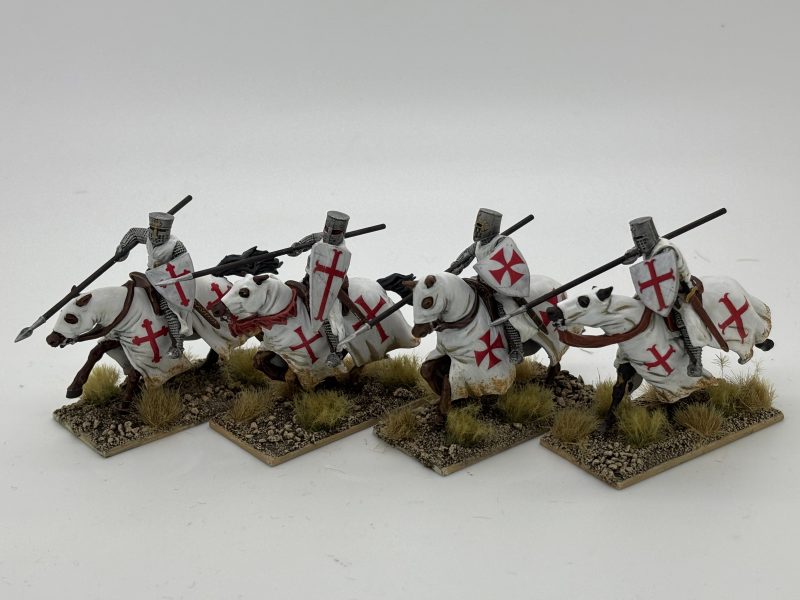
My desire to build a crusader army coincided with the Victrix release of Medieval Foot Knights and Mounted Knights. I have long been an admirer of the Victrix range and I was very tempted by this release, particularly as Victrix were promising to release further sets in the form of Foot Sergeants and Crossbowmen. I started with the foot knights and built an initial two units of twelve knights to make the core of my army. I was not disappointed with the quality of the figures or the vast number of options when it came to building them.
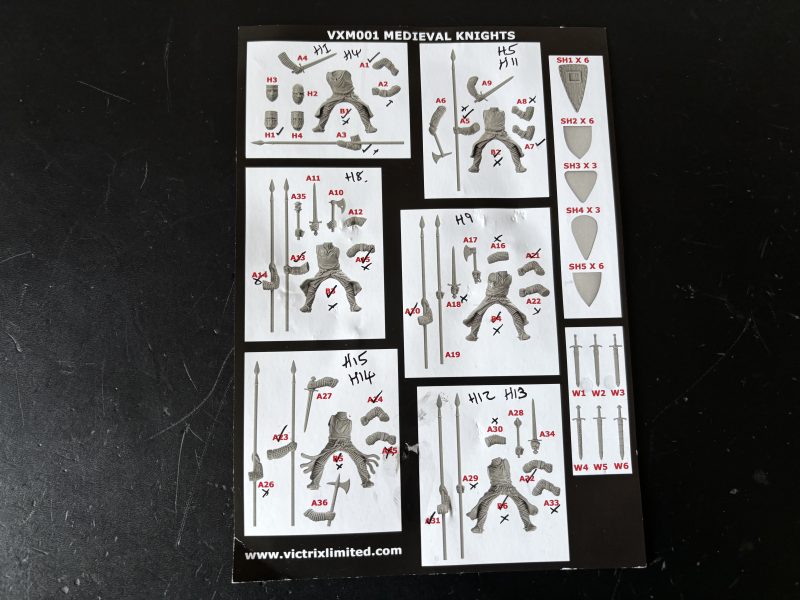
The header from the Victrix Medieval Knights.
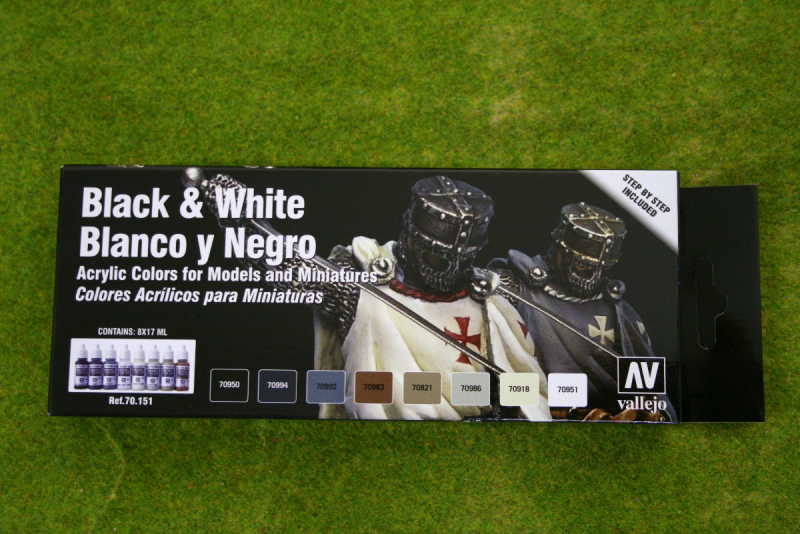
When it came to painting them, I followed the guidance given in the Vallejo Black and White Painting set. I had under coated theFoot Knight figures in Black to make painting the chain mail easier (5 of the foot knights were completely clothed in chain mail) but of course, this made painting the white more difficult! The basic procedure is to first paint the cloth in deck tan, then use German Camo Beige to pick out the shadows, then Neutral grey to pick out the deepest shadows, then Ivory to start the highlights , finally finishing with pure white for the top highlights The paint numbers can be seen in the picture above. Rather than go through that process in detail, I’ll show you my slightly faster procedure for the mounted knights that I used.
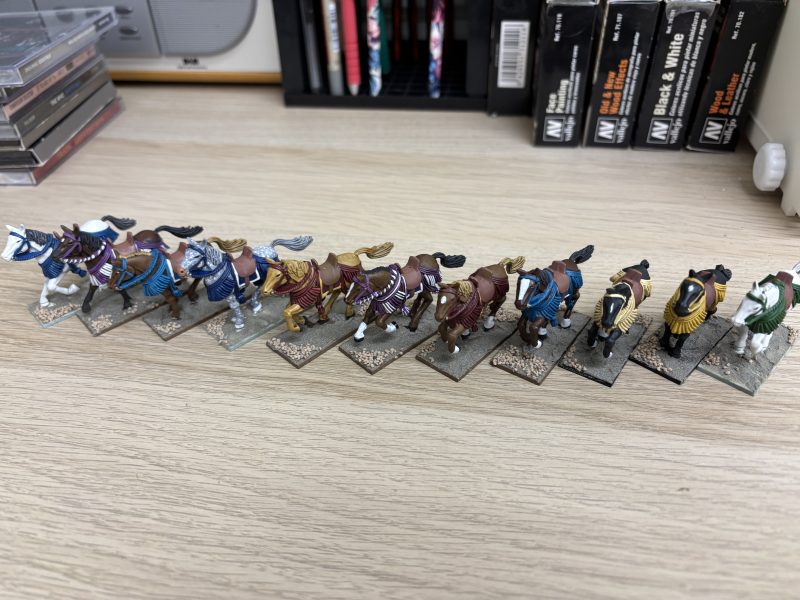
Knights and horses being assembledI wrote the horse number on each base for reference when adding decals
So starting with assembly, I first put together the horses. A good tip here is to write on the base, the number of each horse. This will make life much easier when it comes to applying the decals if you are using them. Next up were the riders. The assembly leaflet makes it clear which arms and heads will fit each body. I made sure that I had a variety of poses for all eighteen of my figures by ticking or crossing each option as I used it. I also marked down which horse that the figure would be sat on.
The assembly leaflet is a clear guide to options for each bodyPainting in progress
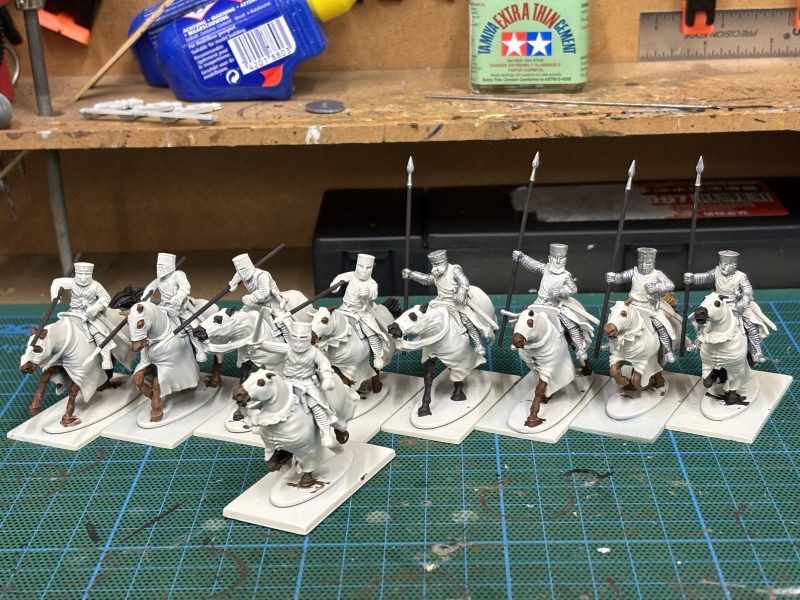
Once assembled and cleaned up, I primed the horses and riders with Colour Forge Wight Bone. This is an off white/very pale grey and replaces the need to coat the cloth with deck tan. Next, I picked out the creases with German Camouflage Beige but left out the step with the neutral grey in the deep creases. I felt that this was too harsh. In fairness, the example on the Vallejo instructions was for a 54mm figure, so I think that the neutral grey is not needed in the smaller scale of 28mm.
Detail added and basing started
I then painted the cloth with Ivory, leaving some of the undercoat in the creases and of course, the camo beige. Finally, I went over most of the ivory with pure white. It’s a matter of taste and judgement as to how much white you use – I have probably been over zealous as I like my figures to look nice and bright on the table!
Painting completed and bases painted ready for tufting
I haven’t detailed how to paint the rest of the figures. The Chain mail and armour is simply army Painter Plate mail washed in Dark tone. For the horses, I just used three different browns on three sets of three horses and washed them in dark tone. The leather work and saddles were painted from a choice of Red Leather, Saddle Brown or Leather brown.
I used Gamers Grass spikey beige for desert thorns and 6mm beige for dried grass.
The bases were covered in Vallejo dark earth texture paste and whilst still wet, I added some fine Talus from Woodlands scenics and then dipped the whole lot into fine sand. Once dry, I covered the bases in strong tone and then when this had dried, highlighted the sand with Vallejo Iraqi Sand, first straight out of the pot and then with some added white for a highlight. The bases were finished with a mixture of Gamers grass beige spikey and normal beige tufts.
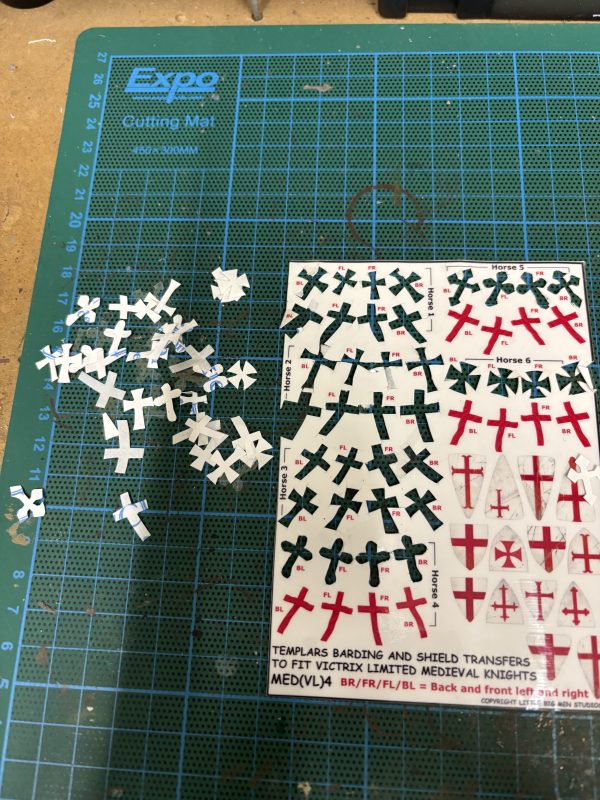
Adding the decals was time consuming and fiddly – it took 3 hours to do all the horses!
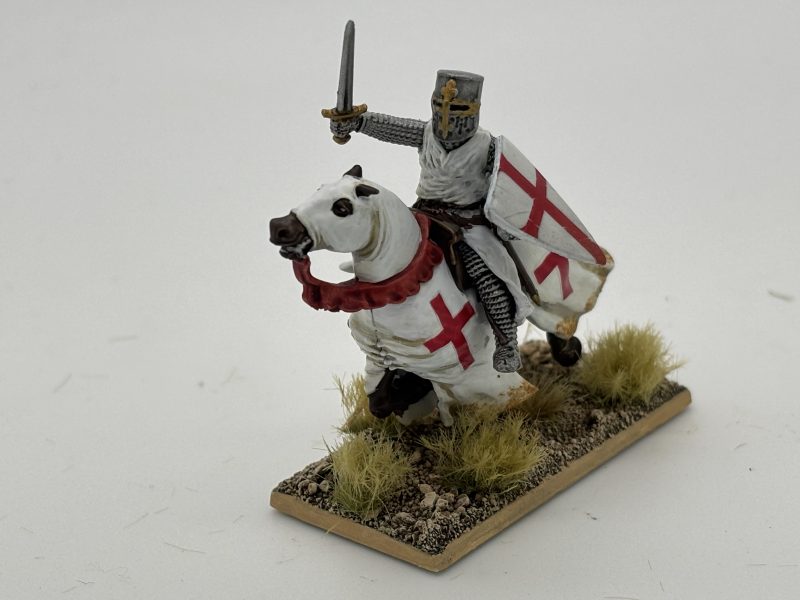
Adding the decals from the Little Big Man Studios was a long task but well worth it. As I had numbered the horses bases, it was very straight forward to locate the correct decals for each horse. I also matched up the crosses on the shield decals to match the decals on the cloth. There’s no guidance to suggest that you do this, it just made sense to me to do so.
Shields sprayed and inked
I had painted the shields separately from the rest of the models. I sprayed the back with Leather brown and then gave them a heavy coat of strong tone. The front was sprayed with Wightbone, then painted with Vallejo white before the decals were added. I used superglue to attached the shields to the riders.
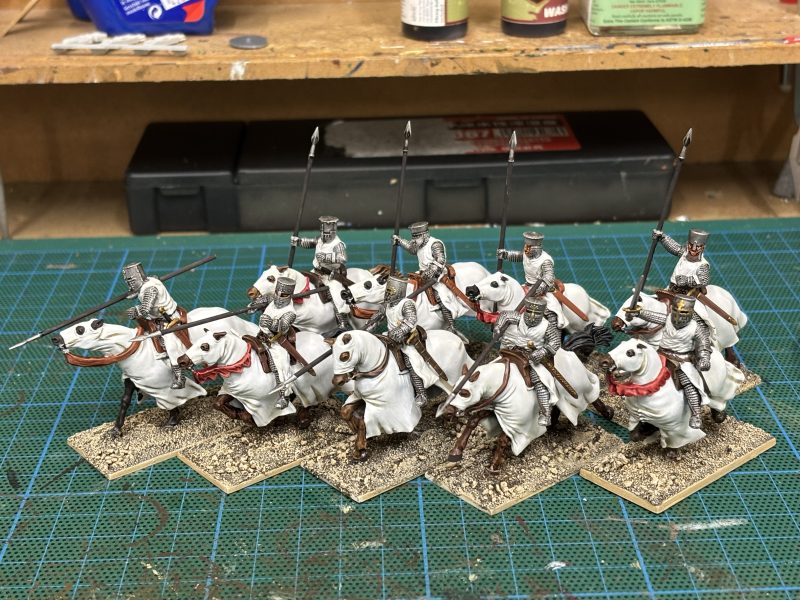
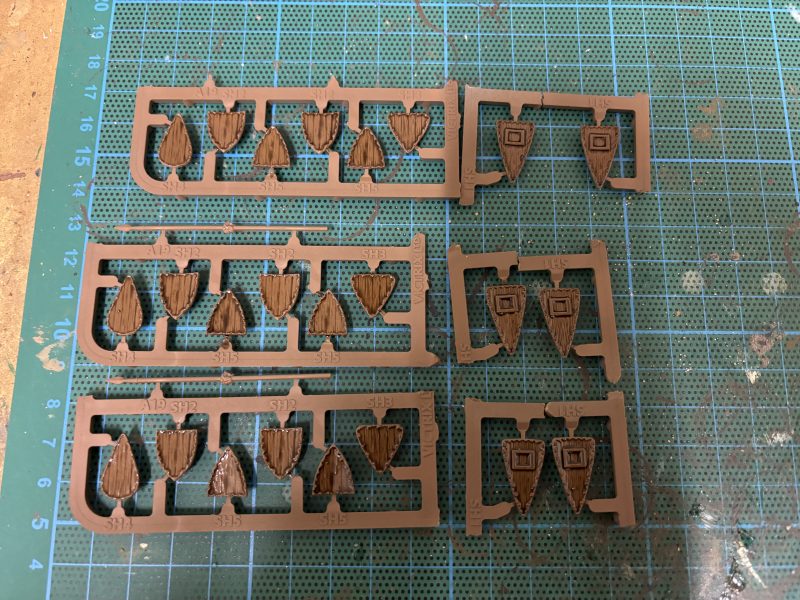
Half the unit have lances raised – I’ll add some flags or pennants in the future.The other half of the unit with lances down!
I also decided to add some weathering to the bottom of the horse caparisons. I used a Vallejo sienna pigment fixed with a drop of airbrush thinners lightly stipled on to get the effect that I wanted
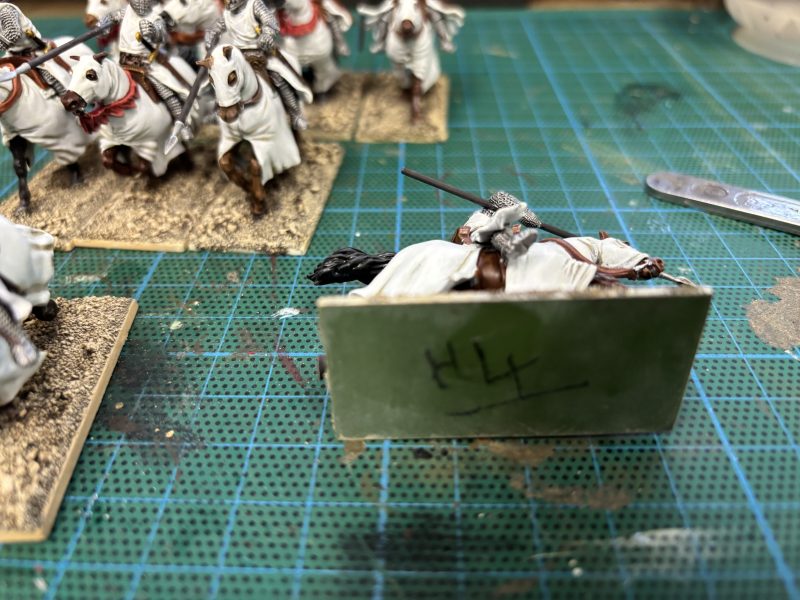
The full unit completed
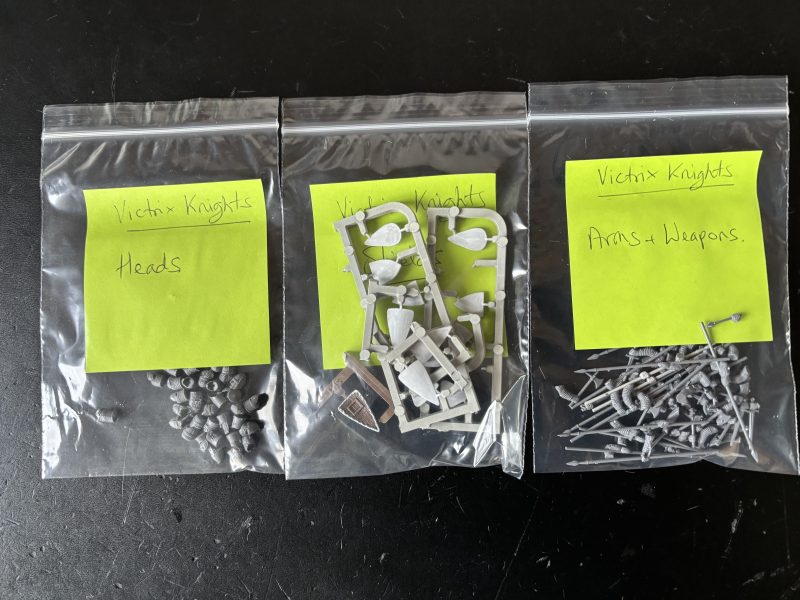
One final note. Once everything was done, I was left with a number of spare heads and arms on the sprues. As is my normal practice, I snipped them all off of the sprues and stored them in labelled Zip Loc bags. They take up less space this way but are easily recovered for future projects.
All the spares tidied away in zip locs!
I hope that this has been useful. Happy Modelling!
Baldrick leads the Coach and it’s escort onto the table
Following my return from the excellent Battleground show at Middlesbrough, I was leafing through a catalogue given out by Tiger Miniatures and noticed that they had a simple scenario for Elizabethan troops in Ireland. That was enough to inspire me to come up with my own similar scenario using the only Elizabethan troops that I had, namely, the superb set from Flags of War, the Queens Envoys. In reality, these models have a remarkable similarity to the cast from Black Adder two! It also meant that I had an excuse to use my scratch built medieval coach. You can read how I built my coach in a previous blog here:
Rather than produce a battle report, I thought that it would be useful to give details of the set up, the OOB, the special rules, special events cards and a brief outline of the Irish troops involved. You will of course need the Never Mind the Bill Hooks Deluxe rules to play the game. There is a brief battle report on the Bill Hooks Facebook group page here;
Just note that if you would like to join the group, please say yes to agreeing to following the group rules when answering the joining questions.
The table set up – note that I later filled in all of the wooded area on the mat with trees to make it clear that the woods extended to the farm field edge. The road is pre printed on the battle cloth.
The order of battle for each side was as follows:
The Irish deployed 9 inches from table edge
Lord Brendan FitzMaurice’s Retinue
WARD 1
Commander Lord Brendan Fitzmaurice 0 points
Troops 1 Unit of formed Kern 12 points
1 Unit of Gallowglass 18 points
Total 30 points
WARD 2
Leader Sir Patrick Fitzgerald 5 points
Troops 1 unit of Formed Kern 12 points
1 unit of Gallowglass 18 points
Total 35 points
WARD 3
Leader The Earl of Kildare 5 points
Troops 2 units of Light Horse 24 points
Total 29 points
SKIRMISHERS AND ARTILLERY
4 Units of Kern 24 points
Total 24 points
ARMY TOTAL 118 points
Black Adders Retinue
Lord Black Adders Retinue
WARD 1
Commander Lord Black Adder 0 points
Troops 2 Units of Bowmen 24 points
2 Units of Billmen 24 points
Total 48 points
WARD 2
Leader The Bishop of Bath and Wells 5 points
Troops 1 unit of Bowmen 12 points
1 unit of Billmen 12 points
Total 29 points
WARD 3
Leader George the dolt 5 points
Troops 2 unit of Light Horse 24 points
Total 29 points
SKIRMISHERS AND ARTILLERY
Band of Gunsmen 6 points
Crossbowmen 6 points
Total 12 points
ARMY TOTAL 118 points
The two armies close.
Black Adder Bill Hooks Scenario Briefing Document
Black Adder is tasked with getting the treasure coach along the road to the village and safety. The Irish are determined to prevent this from happening! Standard Bill Hooks rules are used with the following exceptions or additions.
The game starts with Baldric and the coach deployed on the table at the start of the road. You may deploy one unit of skirmishers alongside the coach if you choose.
Shuffle all of the leader cards into the play deck. In terms of quality, George is fixed as a Dolt. Roll for all the other leaders as normal. Note that as the English have a dolt, none of the other commanders can be rated as a dolt, so re roll any ones. The Irish are all rated as normal – there are no hero’s and no dolts on their side!
There is no movement phase. All units, except the coach, start off the table. As the leaders cards are drawn you may deploy as follows. The Irish may deploy anywhere on their side of the table up to 9” from the baseline. The English must enter on the road or to one side of it at the base line and may take one move. Remember that infantry may move through other infantry and cavalry may move through cavalry freely but if they are moving through dissimilar troops they will take a disarray marker.
When a bonus card is drawn, move Baldric up to 6” along the road. The coach must move a minimum of 3 inches each time a bonus card is drawn. You may then move the coach up as far as Baldric has moved and no further! Baldric cannot be targeted by the Irish nor can he be killed or captured. He cannot give orders. He is there to mark the coach’s progress. If the road is blocked by either an enemy unit or a friendly unit, he cannot move through it. Note if one of the bonus cards is the last card out you must still move Baldrick and the coach.
The units commanded by Black Adder have been specially drilled by him to guard the coach. As long as they are within 9” of the coach, they will get a free 90 degree turn without incurring a disarray token. In addition, they may turn and face an enemy, or react as they choose, regardless of how many moves that the enemy has taken to engage. This ONLY applies to Black Adders units and ONLY if they are within 9 inches of the coach!
The Irish may not enter the Village.
Killing the Irish Commander or Black Adder does not end the game. The game ends when: the coach arrives at the Village ( this should take 5 turns – the road is 60 inches long). However. if the coach doesn’t reach the village by the end of 6 turns, the Irish win. If one army loses it’s morale tokens, it will lose as in the standard game.
The Irish can also win the game by capturing the coach. If they are able to drive all English units (skirmishers are not included) more than 6” away from the coach and get a unit to touch the coach, they have succeeded in capturing the coach!
If you draw a special event card that applies only to the enemy, you may choose to ignore it and draw another card.
The battle is on!
Game Briefing for the Irish Adventure
Just some quick reminders regarding the Irish troops.
All kern can move 8 inches, even formed Kern! Formed Kern can move through terrain at 6inches per action but receive only 1 disarray regardless of how far they move in terrain.
All kern can shoot Javelins and bows at 6 inch range only. Formed Kern may shoot twice in a game with half their numbers. Bands have unlimited arrows and javelins.
Formed Kern will not ‘bounce’ from melee.
Gallowglass may shoot once per game with half their numbers. Range is 6inches. They move 6 inches and reduce to 4 inches in rough terrain, being disarrayed each move they make.
Irish troops are brittle if shot at. All kern save on 6’s, Gallowglass, 4+, Cavalry 5+. They are tougher in melee! Check the QRS card for details.
Irish cavalry get no charge bonus! They can throw Javelins 6inches. They can dismount to form a unit of 6 Gallowglass. They can combine two such units to form a full unit of 12. You can activate them on the skirmish card or leader card but not both!
Only Irish skirmish units must pursue broken enemy units for this scenario.
The Irish are beaten away in this encounter!
The Special Event cards
I would recommend that you use no more than eight special event cards. Choose four from the core rules deck and add in these four. For even more mayhem, just use the four below!
A CUNNING PLAN!
Baldrick has a cunning plan that delays the convoy by two bonus cards whilst he explains it. Play instantly
LUCK OF THE IRISH
A unit of Irish have their saves upgraded to MAA for shooting and melee for the duration of the game. Play if you are Irish!
LORD FLASH ARRIVES!
Lord Flash arrives to save the day! Deploy him and a unit of veteran bows or bills at the village entrance.
Place his card in the pack for next turn and activate as normal. Play if your are English!
THE BISHOP
The Bishop draws his flaming hot sword! Double his hits in all combats even if he is already engaged. Play instantly.
A few thoughts on the game
The Irish have only six morale tokens to the English contingents eight. The Irish will suffer if targeted by arrow storms but can move fast, even through cover and the Gallowglass are particularly tough in combat. The terrain is deliberately designed to help the Irish and hinder the English. George is deliberately given the cavalry to command as his status as a dolt will make this difficult. The coach will keep moving as long as the road is clear – this can be a help or a hindrance! The Irish kern skirmishers can move fast and can be very effective in combat. However, their morale is brittle – if they see one of their group run, they all might run! They will also ‘bounce’ and become disarrayed if they fail to win their combat. The English are likely to get snarled up – it will take all of Black Adders cunning to keep them moving!
It’s been a long term goal of mine to build a Medieval Village or Farm. Partly as a modelling project and partly as a way of expanding my scenery collection for use on the wargames table. I really liked the idea of using the Sarrissa Precision Terrain tiles as I could build the farm or village in modules and expand it at my leisure. I had built a small Church and a barn sometime ago but the project had rested on the back burner for the last few years.
Sarissa Norman ChurchThe barn with new wheat field attached.
I also had picked up a coco fibre door mat from Ikea years ago, with the aim of using it to make Wheat fields. The door mat became, in effect part of my ‘lead pile’ and was languishing in the shed with other projects that I had yet to start.
Foot mat from Ikea.
The final reminder that I had planned the Medieval village was that when tidying out my cabinets, I cam across a lovely model of ‘Piers the ploughman’ from a foundry set that I had completed sometime ago. It was finding this model that prompted me to get on and add some extra terrain tiles to my village.
Piers the ploughman in his new field.
Making the wheat fields is one of the simplest scenery projects that I have worked on! As I was using the Sarissa Terrain tiles, I cut some seven inch squares of door mat and stuck them onto the terrain tiles.
Door mat cut to size and ready for sticking!
Once the mat was stuck down, I used Vallejo Dark Earth paste to blend the edges onto the tile and then added some stones and grit for extra detail. I then painted the edges using the standard basing method that I follow and added some Woodland Scenics blended turf to finish.
The vallejo paste added, along with the grit and stones awaiting final painting.
You can see the finished wheat field in the picture with the barn. Having successfully made one field, I decided to add another! Of course, I still had plenty of doormat left, so I cut it all up and will use the extra ‘fields’ if needed!
The extra fields as well as a few strips for scatter scenery on my table
I also started work on the ploughed field. I wanted the ploughman to be removable, so I made a sabot frame to hold the model and then used Vallejo paste to coat the terrain tile. The furrows were very simple to make – I just used a sculpting tool to draw through the paste and make the furrows. The following pictures should help to make the process clear.
Ploughed filed on the right in the process of being paintedPloughed field painted and with assorted scatter and tufts added to the unploughed sideSecond ploughed field in progress
Just a few notes for the purists out there! In my research on medieval villages and fields it was clear that they farmed in strips rather than the squares that I have made. However, modelling the irregular strips would not really be practical using the terrain tiles. There is also the question of scale, a contentious issue at the best of times! My fields are probably way too small. A furlong, a typical measurement of land, is 660 feet long, meaning that a 1/48th scale furlong would be 13.5 feet long – a tad too long for my gaming table! The fact that the fields are not enclosed but marked with stones is probably right. In the Medieval and Tudor times, open field farming was the practice. Incidentally, in my research, I came across the measurement term ‘Bovate’ which is theoretically the amount of land that one Ox could plough in a season. A term that I had never heard of before. Finally, the yellow flowers that I’ve used are often seen at the edge of modern fields in Bingham and they are of course Rape seed flowers which I don’t think were around then!
One of my research books! It’s absolutely fascinating to learn of the history in the area where you live!A map of the field layout in Bingham, together with a list of the furlongs!
I also decided to add another barn to the farm. This is still a work in progress. Using another terrain tile, I made a sabot frame for the barn and used a pan scourer to make the thatched roof.
Sabot frame added to the terrain tileNew barn with new roof added
The final picture shows a top view of the farm so far, with the new barns roof primed ready for painting. Of course, the farm will continue to grow as far as my imagination will allow! I’ll post further pictures as I add to it!
I hope that you found the information useful. If you type ‘wheat fields’ into you tube, you will get plenty of videos to help you should you decide to add some to your scenery stash!
OK, I’m sorry, it’s a cheap click bait title to what is really a work bench update! There is some truth in the title though. If you have read my previous blog on how I stay motivated, you will realise that I tend to plan my hobby output six months in advance. For the six months from June to December, my main focus has been and will be to work through my Lead Pile or Model Stash, and turn bare metal and plastic into finished kits. I am happy to say that I am making good progress and gradually, my model cabinets are filling to overflowing point and my shed is emptying!
The Seven completed boxed sets from the original Test of Honour game
To be fair, there’s a long way to go. I have been lucky in that whilst I was running Arcane Scenery prior to my retirement, I accumulated a large collection of kits but gradually, I am working my way through them, where possible, sticking to the main threads of my hobby. A good example of my progress is the original Test of Honour Boxed sets. I had all ten in my stash. I have now completed seven of them with the eighth currently in progress.
The Masked Men boxed set currently on the workbench.
As you can see, I am working on the Masked Men boxed set. However, there was a glitch. When I came to put them together, I realised that the metal heads were not the correct masked versions but simply normal Ashigaru. After a slight twitch brought on by my OCD, I decided to make them up as a mixed batch of Ahigaru that could perhaps be used as Ikko Ikki. I also decided to convert five of them ( the front row) by using arms from the Fireforge sets. I had thought that they would be incompatible but to my surprise, they work really well. Some of the arms needed a bit of filler and adjustment and on close inspection, they look a bit big on a couple of the figures but once painted, I doubt that it will be very obvious on the gaming table.
Sohei Monks
Prior to the masked men set, I also finished the Sohei monks set. I now just have the Onna Bugeshia set and the Ronin set to finish.
Sarissa Skiffs with fighting crew and added detail
I’ve also spent some time adding crew and detail to my growing Medieval Navy. The crew are straight out of the lead pile and are old Grenadier figures, I think. Talking of which, I finally got around to painting some hand gunners for my embryonic Swiss army. Again, I think that they are Grenadier figures.
Swiss Hangunners
Finally, I am still working my way through The LOTR Battle Gamming part work that I collected way back when the films were released. I’ve now reached issue 49 of the 91 issues that I have, although I have some of the later models painted, so technically, I am well past the half way mark with my collection
Shagrat – basing not complete but now done!
I cant say that I haven’t bought any new figures in the last few months but nearly all of my output has been from my collection, meaning that I have succeeded in reducing the Lead Pile and kept focus on my current interests. However, I have promised myself that in the New Year, I will start a brand new project. I still haven’t decided what yet but Romans, Crusaders, ECW, Vikings and Hussites are all on the list!
I have painted some of the DeeZee wolves in the past, in particular for a project that my Granddaughter was working on for school but I had not completed a pack for display purposes. You can read about the school project here:
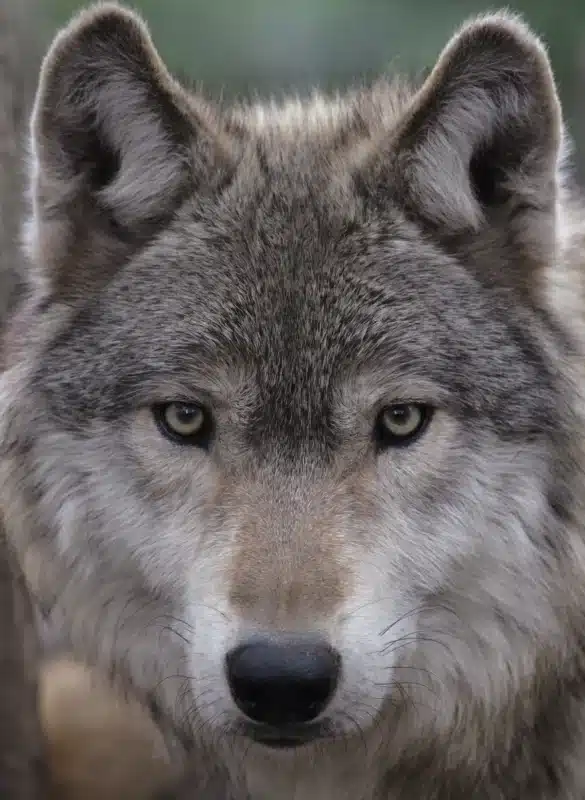
So my next project was to paint a pack ( pun intended) of DeeZee wolves – all six of them. As it turned out, I also had two spare wolves left over from Emily’s project, so I added them in as well. The first thing that I did was to look at some wolf pictures. When you ask someone ‘what colour is a wolf’ they will invariably reply ‘grey’. Well it seems the answer is not quite that straight forward.
As you can see, there’s a lot of brown on a wolf! Of course it depends on the type of wolf that you are trying to replicate. This chart shows that there are quite a few species and different colours!
The DeeZee wolves are supposed to be Dire Wolves, so that opens out even more options. To make life simple for myself!), I decided to paint my wolves in different colours. Part of the reason is that all of the Wolves in the pack are in the same pose, so I thought that by varying the colours, it would draw attention away from the identical poses when they are grouped together.
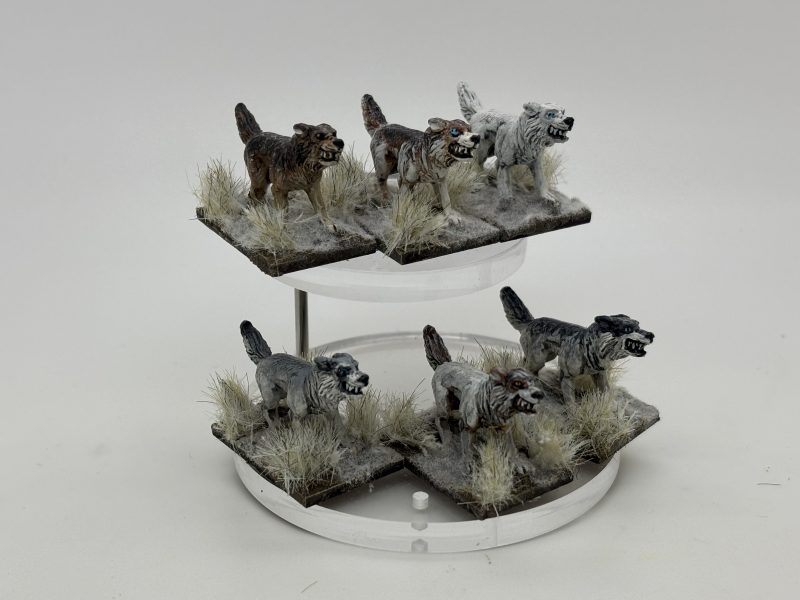
The six wolves from the DeeZee pack plus two spares!
So I started with a couple of tests wolves that I painted in browns. It’s quite difficult to describe how I painted them other than that I started with a light colour on the legs and belly and worked up to the darkest colour for the backs, blending and combining the different shades as I progressed with each model.
Dark Wolves in Brown!
The next three that I ainted were mainly light browns to start with but one of the wolves was finished as white than rather than brown as I experimented with colours and inks.
The next three wolves.
As well as their coats, I also experimented with the eye colour, using black, then I tried yellow, before settling on light blue!
The final three wolves painted in grey shades
For the last three wolves, I used a grey pallet only, no browns at all! As with all of the wolves that I painted, I gave them a coat of either Soft tone ink for the browns or Dark tone ink for the greys, to help tie all the shades together and bring out the detail.
All eight wolves painted awaiting basing
I confess that at this stage, I wasn’t too happy with the results. However, as is often the case, the basing made the difference. I painted the base as usual but then used Gamers grass winter tufts and a snow effect scatter to represent tundra. It seemed to bring everything together.
The six wolves from the DeeZee packHere are all eight!
I’m quite happy with the finished result and I do think that the different colours help to hide the identical poses and make the wolf pack look more interesting!
As I have said, it’s quite difficult to describe how I painted the wolves, they are all slightly different, for reasons explained but here is a list of the main colours that I used:
Brown Wolves: Iraqi Sand 70819; Cork Brown 70843; Light Brown 70929; Black brown 70822
Grey Wolves: White 70820; Sky Grey 70883; Light grey 70990; Dark grey 70994; Black 70950.
Now the good news is that the DeeZee range is in the process of being relaunched so if you fancy a pack of wolves, they will be available to purchase from Footsore Miniatures in the near future. For now here is a link the the DeeZee models that are available:
A recurring theme of my blog is the gaps that appear in my output. My blog output that is, not my modelling output. Since retirement, I am less likely to turn on my desk top computer, which is the main tool that I have for blog writing. I guess that it doesn’t help that I am unable to decide whether to use my blog as a simple record of my modelling achievements or to write articles that I hope will entertain and inform fellow hobbyists. All the time that I had the business, there was a good reason for the latter option as I could point customers in the direction of the blog if they had queries about a topic. Now that I have retired, the only reason for the blog is to record my various painting and modelling projects.
On the subject of recording my hobby progress, I use a small journal and keep a record of what I am doing and what has been completed. The picture below shows a typical entry.
My Modelling journal – Completion count on the left.
I also have Model projects folder that I use to plan each six months of activity. This keeps me focused and stops me going off on tangents and buying stuff that I will never paint. Can you believe that I have 10 categories in the folder! They are as follows: War of the Roses and Bill Hooks armies; DeeZee Miniatures; Napoleonic Armies – specifically Britain and her allies; 1/48th Scale Afv’s and Aircraft; Samurai; Lord of The Rings collection; Naval Collection; Special Characters; Scenery and the Caribbean.
My guide for my modelling time.
There’s enough leeway in those categories to keep me entertained but you wont have to think for very long to see the miriad of periods and themes in the hobby I have excluded … for now! In addition, when I plan the next six months, I decide whether a category is on hold or dormant. So for example, my Napoleonic and Caribbean categories are both on hold even though I have plenty in the lead pile to paint from these categories.
To be fair, my wargaming buddies are somewhat amused by my approach and I understand why. It is a bit OCD and you could argue that the time I put into the blog, journal and project folder could be spent on painting or researching my next project. However, the result is that my ‘lead pile’ is actually shrinking and I have a cabinet full of completed projects rather than a box of half built and half painted stuff. I also find that the Journal serves as a motivation to get more done – I know that this time last year I had painted 113 Infantry and 22 cavalry figures, so my output is slightly down. I suspect the warm summer has had an effect, I don’t paint so well after a beer or two! As winter is coming, I will up my output!
I have one other rule with regards to my modelling. If I go to a show, I must paint whatever I purchase before that show comes around in the next year. If I haven’t, I will not buy anything else!
I’ve also started to re evaluate my use of Facebook. It made sense to post on the Arcane Scenery page when I had the business but once I retired, it was less important to do so. I also have a love hate relationship with Facebook. I realise that providing content for Zuckerberg and his company simply gives Facebook the opportunity to use my time and energy to make money out of promoting advertising to other people. However, it’s nice to keep in touch with Family and friends. The problem is that about 80% of my personal feed is filled with adverts and spam, never mind the politics of some of my friends. As I am a confirmed contrarian, I have gotten into trouble whenever I have engaged with these posts as I tend to disagree with most of them!
I had in the main, stopped all posting on Facebook, other than ‘liking’ anything that took my fancy in the hope that algorithm would reflect my preferences more. Alas, that doesn’t seem to have worked out particularly well so I have decided to use the Arcane scenery page to post more often ( I said that I was a contrarian), almost daily just to record what I have been up to in my hobby. If you should have the faintest curiosity as to what I had to eat, where I went on holiday, what I think of Spurs Transfer policy, do I think that Liverpool will win the league, what conspiracy policy I currently follow or who I vote for, you’ll have to talk to me, preferably in a pub, having bought me a pint and don’t get all sniffy if you don’t like the answers! By posting more frequently on Facebook I hope to keep focused on my projects and perhaps to encourage my wargaming friends to engage with their projects, thereby spurring me on with my own.
So sorry about a slightly different tone to my blog. I just wanted to get these thoughts out of my system and perhaps the idea of a modelling journal might be of interest to others. Just to show that I have been doing some modelling as well as guzzling beer and rambling on, here are a few pictures of projects completed in August.
Deezee walking mammothKing Isildur from the LOTR collectionElendil from the LOTR collection Magazine #47All the crew added to the White Lion ( rear) and the White Hart (front), extra detailing and ‘token’ rigging added.Chobei.Skirmishing Archers for Never mind the Naginatas.More Ashigaru – work still in progress.
I’ve just returned from a superb Holiday in Croatia. Dubrovnik, to be more precise. You may be aware that the Old Town in Dubrovnik was used as the location for many of the sets in the hit series ‘Game of Thrones’. Of course visiting the beautiful City has inspired me to watch ‘Game of Thrones’ for the fourth(?) time – I am currently working my way through the first series.
Fort LovriJenac
It also reminded me that back in Lockdown 2022 ( was it really that long ago?) I wrote a brief adaptation for GOT in Bill Hooks. We never actually played the rules through. For a start, I didn’t have the figures and we weren’t able to meet up for gaming. I was also still heavily involved in the final playtesting oof NMTBH’s and I was busy building a decent WOTR army with no time to spend on converting figures to GOT. So all the games were played out in my imagination. Lets by fair, it was more fun than thinking about reality at the time!
The harbour at Old Town, Dubrovnik
But my holiday reminded me that I had written an adaptation and I thought that it would make an interesting blog article and at least make the rules available to anyone that fancied using them or adapting them to play a slightly different game of Bill Hooks.
View of the town from the walls
It is unlikely that I will actually use the rules for GOT. I still have too much on the workbench to start to painting GOT retinues. I guess that I could simply use my WOTR collection but I’d rather have some ‘accurate’ troops and in particular, characters.
Another view of Kings Landing…I mean Dubrovnik!
But never say never, I’ve always wanted to sit on the Iron Throne…
So here are the draft rules – feel free to use or adapt them as you wish.
Never Mind the Bill Hooks for Game Of Thrones
It’s been well documented that the book series ‘Game of Thrones’ by George R R Martin, has borrowed heavily from the history of the Wars of the Roses. The fictional Seven Kingdoms struggle took many of the characters and incidents from the Wars and used them as the basis for plot lines within the amazingly successful series. Even the map of Westeros is based on the map of the British Isles. Where George Martin has been particularly clever, has been the limited use of both magic and fantasy elements in the plot. Yes, I know there are dragons, and walking dead and much more, but for me, they are not dominant in the story. It is the characters and the relationships, the tales of betrayal and treachery, friendship and heroism that kept me engaged through the series of the seven books and TV series. Oh, excepting the last episode….
Well, before this turns into a fan boys review of the Game of Thrones, I thought that I would think about how the rules for Never Mind the Bill Hooks could be adapted to allow players to re fight their own battles in the Game of Thrones world created by George R R Martin.
There are a number of disclaimers – first no attempt to steal copyright is intended, this is simply one admirers view as to how war gamers may choose to adapt a set of rules to a fictional book and TV series.
Second disclaimer is that none of these rules have been play tested other than in my imagination and in my own garage. I have therefore chosen to modify the existing rules rather than go for heavy re writes.- These are simply some ideas to get you started. If you like them, please feel free to add or modify them with your gaming friends. I suspect that your imagination will probably be as good, if not better than mine.
Thirdly, I have deliberately excluded the use of magic (except in a couple of the Special events cards) and there are no Dragons! If you really want a more fantasy feel, you will either need to introduce your own rules or take a look at Andy Callan’s Billhooks Fantasia (AKA Never Mind The Warlocks) which is available from Wargames Illustrated or www.nevermindthebillhooks.com
Finally, when it comes to figures, you can obviously convert your own but there are licenced miniatures out there if you fancy something to add character to your army.
And so, without further hesitation, here are the rules!
The basic game is played as written in the original rules NMTBillhoks rules or core Billhooks Albion in the NMTBillhooks Deluxe – if there are any doubts in the mechanisms described or disputes in game play, please refer to them for the final word. The modifications are primarily in the make up of the Armies and special characteristics that are given to them. I have not invented new gaming mechanisms!
Leaders
You may have one MAJOR hero in your army. They are still rated as level three leaders with the following additions.
Major heroes are immune to testing when a unit that they are with is hit with any sort of missile fire. Major Heroes can only be wounded or killed in Melee (unless as a result of a special event card….)
Major Heroes cause disarray in leaderless enemy units when charging home.
Major heroes may have a ‘sidekick/friend’ with them to add to their effectiveness.
Friends may be rated up to level two leaders. They may contribute to any melee that they are involved in by rolling one or two extra hit dice, according to their rating. Note that they are an addition to the unit that they are with, not part of it.
Hits on Major leaders may be allocated to the sidekick as the owning player wishes….
Example of Major Heroes:
Jon Snow; Rob Stark; Jamie Lannister; Tyrion Lannister; Tywin Lannister; Stannis Baratheon; Daenerys Targaryen; Euron Greyjoy.
Examples of Friends;
Bron; Dire wolves; Ser Mervyn Trant; Sr Davos Seaworth, The Hound, Grey Worm, Victarion. Some of these could actually be classed as heroes – it’s up to the players to decide who is leading their armies!
There are many characters that you could use as Major heroes and friends – to see a complete list of the hundreds of characters, just refer to the back of any of the George RR Martin books.
Army Composition for Major and Minor Houses
There is no Gun powder in GOT so no Handguns or Artillery! The points value of troops is as for the standard NMTBHs rules.
The troop types are split into:
Standard (Extras), which includes the ‘normal’ troop types such as Billmen, Bowmen, Crossbowmen, Pikemen, light horse and Levy.
Elite, which includes Men At Arms and Mounted men at arms.
Allies, which includes any ‘exotic’ units brought in from other sources.
For every Elite unit in your army, you must have at least one standard unit. This will allow you to be more flexible in building your army and you may have more of the tougher units. There is no restriction on the mix of these units.
Crossbow men may be mustered as units of twelve. They can shoot at 12 inches and hit on 5 or 6. They will cause MAA to go down one armour class. They may only shoot once per turn. They have unlimited shots. They may not shoot as a reaction to a charge. ( they are too busy/paniced to fiddle around with their windlasses!) They may evade as per bowmen or skirmishers.
Mounted men at Arms may be mustered as units of 8. They have all of the same rules in NMTBH’s but now have a superior morale check 2D6.
The major houses may only have one unit of ‘Allies’ per army and only one type of Ally, assuming that the rules allow alliances. I have included this to stop power building of armies but if players want to mix and match, it is up to them!
Special Rules for Houses
I have only included the two main houses here, the Lannisters and Starks. If you wish, you can add to this section!
Lannisters may add two extra Army Morale tokens to their pot!
Any Stark leader may take a Dire wolf as a ‘friend’ or replacement for a friend. Dire wolves have two wounds and two attacks, cause disarray in all units unless the opposing unit is lead by a Major Hero. They may only enter into one combat sequence. Once the combat is resolved the Dire Wolf is removed – it is too busy eating its dinner!
Examples of Major Houses
The Lannisters, The Starks, The Baratheons, The Greyjoys, The Tully’s, The Freys, The Tyrells, The Targaryens, House Martell to name but a few!
Examples of Minor Houses
House Braken; The Vale; The Stone Crows; House High Tower, Dondarrion, House Dayne, House Karsark, House Mormont.
There are many houses to choose from and which one you choose is up to you. Again, there are plenty of references in George RR Martin’s books to choose from. You might also look the House sigil and motto for inspiration regarding any special rules that you use. So for Example, House Baratheons words are ‘Ours is the Fury’. Perhaps that would give their Men At Arms (foot Knights) a Furious charge, re-rolling all hits in the first round of melee.
Special Armies/Allies.
The Wildlings
All Wildling troops are rated as Levy in points value. Otherwise, they are treated in morale tests as normal troops. Regardless of normal troop type, they save on a 5 or 6.
Wildlings are not permitted to field Men at Arms or Cavalry.
Wildlings move at the same rate as skirmishers and movement is not affected by bad going.
They may have a Major hero leading them.
They may field skirmishers.
They may have one giant per army or 100pts (?) of troops.
They may have one Mammoth per army or 100pts of troops.
GIANTS
A Giant has the same stats as a unit of Men at Arms and so he can can take 12 wounds and save on a 3+ vs shooting and in melee. He attacks with the same effect as a unit of men at arms, ie 18 dice if unwounded. You will need to do some book keeping with this unit! As the giant takes hits, so his effectiveness will diminish. He will also check morale in the same way as the men at arms will do so. Even a Giant might decide that enough is enough if he has taken more than 6 hits or lost a melee! If daunted or routed, he will go straight back through any units behind him causing that unit to take 3 automatic casualties ( Unsaveable) as well as causing disarray to the unit. These units will also have to take an instant morale check. Nearby units are not affected.
Mammoths
Mammoths are treated as heavy cavalry. They have 8 wounds and can attack with 16 hits. They can only move 6inches per move and cannot charge or receive a charge bonus. Any riders are considered to be part of the Mammoth for the purposes of attacking. As with the giant, you will need to note the casaulties taken. Mammoths save on a 3+ regardless of whether in melee or from ranged shots by any weapon. They test morale on 1D6 +2. If they are daunted or rout they will go straight back through any units causing that unit to take 3 automatic casualties ( Unsavable) as well as causing disarray to the unit. These units will also have to take an instant morale check. Nearby units are not affected.
Note that although Mammoths and giants are big and can be seen over the top of other units, they may not be targeted unless a leader is with the opposing shooting unit to direct the fire. It is assumed that a leaderless shooting unit will too overawed to shoot straight!
Because of their size, Giants and mammoths cannot move freely through friendly units. If they do so, they inflict 3 unsaveable hits, the same as if they had routed through the unit.
ARMY OF THE DEAD
The Army of the Dead have no allies and are almost unstoppable. I think that they would make for an interesting solo game as the Army of the dead will simply advance relentlessly towards the opposition. You will need a lot of undead figures for this army! I also suggest that you consider arming some opposing units and at least one hero with weapons made from either Dragon Glass or Valyrian steel. Hits from theses weapons on the undead ( including the leaders), are unsaveable).
There are no morale tests for units in the Army of the Dead! They cannot be daunted, they cannot rout! There is one exception. They can be disarrayed by terrain or obstacles. All troops are rated as Levy in points value. Regardless of normal troop type, they save only on a 6.
They are not permitted to field Cavalry, Men at Arms, pike men or any missile troops or skirmishers. They can still form blocks of two units.
They move at 6 inches, as other units do and are affected by bad going and obstacles.
They may have a Major hero leading them – White walkers only.
They may have one giant per army or 100pts (?) of troops.
They may have one Mammoth per army or 100pts of troops.
There are no Army Morale tokens. To stop the army of the dead you must wipe them out or kill the leader.
In the manoeuvre phase, units may only move directly forward towards the nearest living unit.
The army of the Dead can’t stand still. If their units do not receive an order they will move 6 inches towards the nearest living unit regardless of whether a leader is with them or not.
At the end of each turn, another standard unit of dead will appear at the table edge and move towards the nearest live unit.
The Nights Watch
The Nights Watch should be treated in the same way as the major houses of Westeros. Except that they cannot field Mounted Men at arms or pike blocks. They are able to have units of Foot Knights.
They may field skirmishers.
They may have a Major hero leading them.
The Nights watch may also be lead by a Stark Major hero and dire wolf.
The Dothraki
The Dothraki may only field armies composed of units of Light horse in units of 12. These units may roll 2 D6 for morale but otherwise act the same as other light horse units, fighting in two ranks. One full unit will therefore throw 18 dice in attack, save on a 4+ in melee, and a 5+ against missile fire. The Dothraki can also field units of 8 light horse to be activated on the skirmisher card.
In addition, you may take half your units of Dothraki screamers armed with bows. They can shoot once per turn with a range of 12 inches. They will hit on a 6. They have an unlimited arrow supply.
Dothraki are extremely mobile and may move two units during the manoeuvre phase.
They may have a Major hero leading them.
The Unsullied.
The Unsullied may only take either pike blocks or Swordsmen. Swordsmen are rated the same as Men at Arms but save on a 4+. They are not permitted any cavalry or missile troops or skirmishers.
As highly disciplined troops, the Unsullied will not be disarrayed by any formation change in either direction or facing. They will always turn and face cavalry or flank attacks regardless of how many moves the enemy are away from them.
Unsullied pike blocks always share hits equally between their component units They will not become disarrayed after second round of combat but continue to fight as a block regardless.
The Unsullied will not become daunted as a result of a failed morale test but they will still break on a morale roll total of 4 or less. They will ignore any troops, even of their own army routing alongside or near to them.
They may have a Major hero leading them.
Special Events, Bonus and play deck Cards
The play deck will essentially be the same for any other NMTBH’s game. If a side is not allowed skirmishers, simply remove this card from the deck.
The bonus deck is played as standard.
Special event deck. I suggest that you use a maximum of 10 special events cards including these listed below.
Remove the Local Truce card and replace with ‘Faceless man’. Playing this card will kill your opponents major hero. Remove him and his card from the game. His friend may fight on as a level 2 commander in his place. This card does not win the battle unless your opponent has run out of commanders! Your opponent is free to fight on should he wish to do so. However, if played on the leader of the Army of the Dead, all the dead will instantly drop, it is game over.
If you are playing with the Army of the dead, add in ‘All rise’. Playing this card will allow you to ‘revive’ all undead casualties. All of the Army of the dead units are made back up to full strength. A very powerful card that if drawn by the undead player could be a game changer, to say the least! Of course if the non Undead player pulls it, they can be reassured that nothing that they ‘kill’ is getting back up!
Dragon Strike! Play at any time by targeting a unit and rolling 12 dice. 3+ is an instant kill with no saves. The unit is also disarayed for a morale check. All units within 12 inches become disarrayed. If they are already disarrayed, then they become daunted.
Dondorian rises! You may bring back any commander or major hero who has been slain. They will either regain their original status, if a major hero, or will be ‘promoted to a hero! The unit that they are leading can remove any disarray or daunted tokens.
In conclusion
I have only scratched the surface when it comes to the fantastic world created by George RR Martin. I haven’t mentioned (until now!) the Kingdom of Dorn, Bravos, The Summer Isles and other lands beyond the Narrow Sea. That leaves plenty of scope for players to use their imagination and create the armies and games that they would like to play. My final word of advice is to try to stick to the basic core rules of NMTBH’s. The rules provide a great framework for a fun and playable game where the cards and dice throws provide all the narrative you will need for a superb battle that you will need for a superb battle!
A recurring question that appears on many forums for wargames rules is ‘what sort of basing convention is required to play these rules’. My favourite game, Never Mind The Bill Hooks, has no requirements for a particular type of basing. You can pretty much do whatever you prefer with your troops; square bases, round bases, 20mm, 25mm, Single figure basing, multiple figure basing, it’s up to the player. That said, the game is designed to account for casualty removal on a figure by figure basis. You don’t have to do this – you can use dice or some other method of accounting for casualties but removing the figures from units does clearly indicate how that unit is fairing in the game. For example, it is quickly apparent which unit requires a morale test at the end of a turn if half of it’s figures have been removed from play!
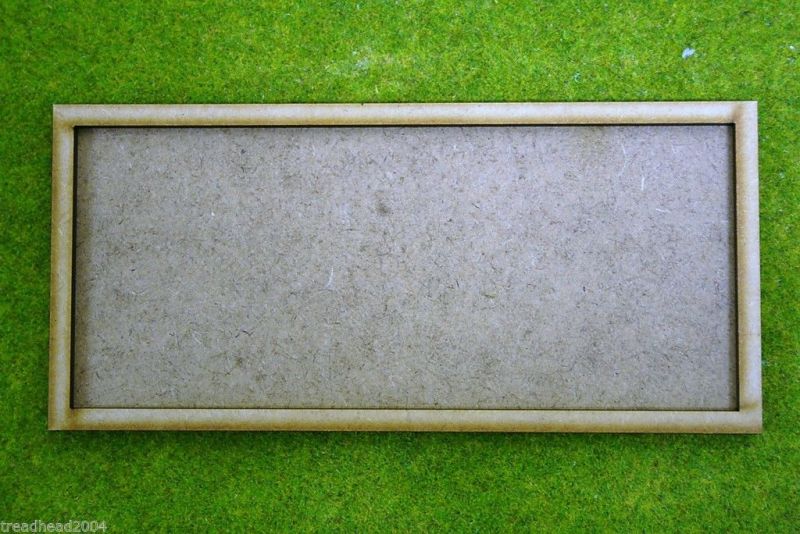
My new movement trays before assembly.
There is one other piece of basing that I think helps in the game – Movement trays. They allow you to keep your units separate from each other, facilitate easy movement of units in the game and help to define a units space on the table. I really like them!
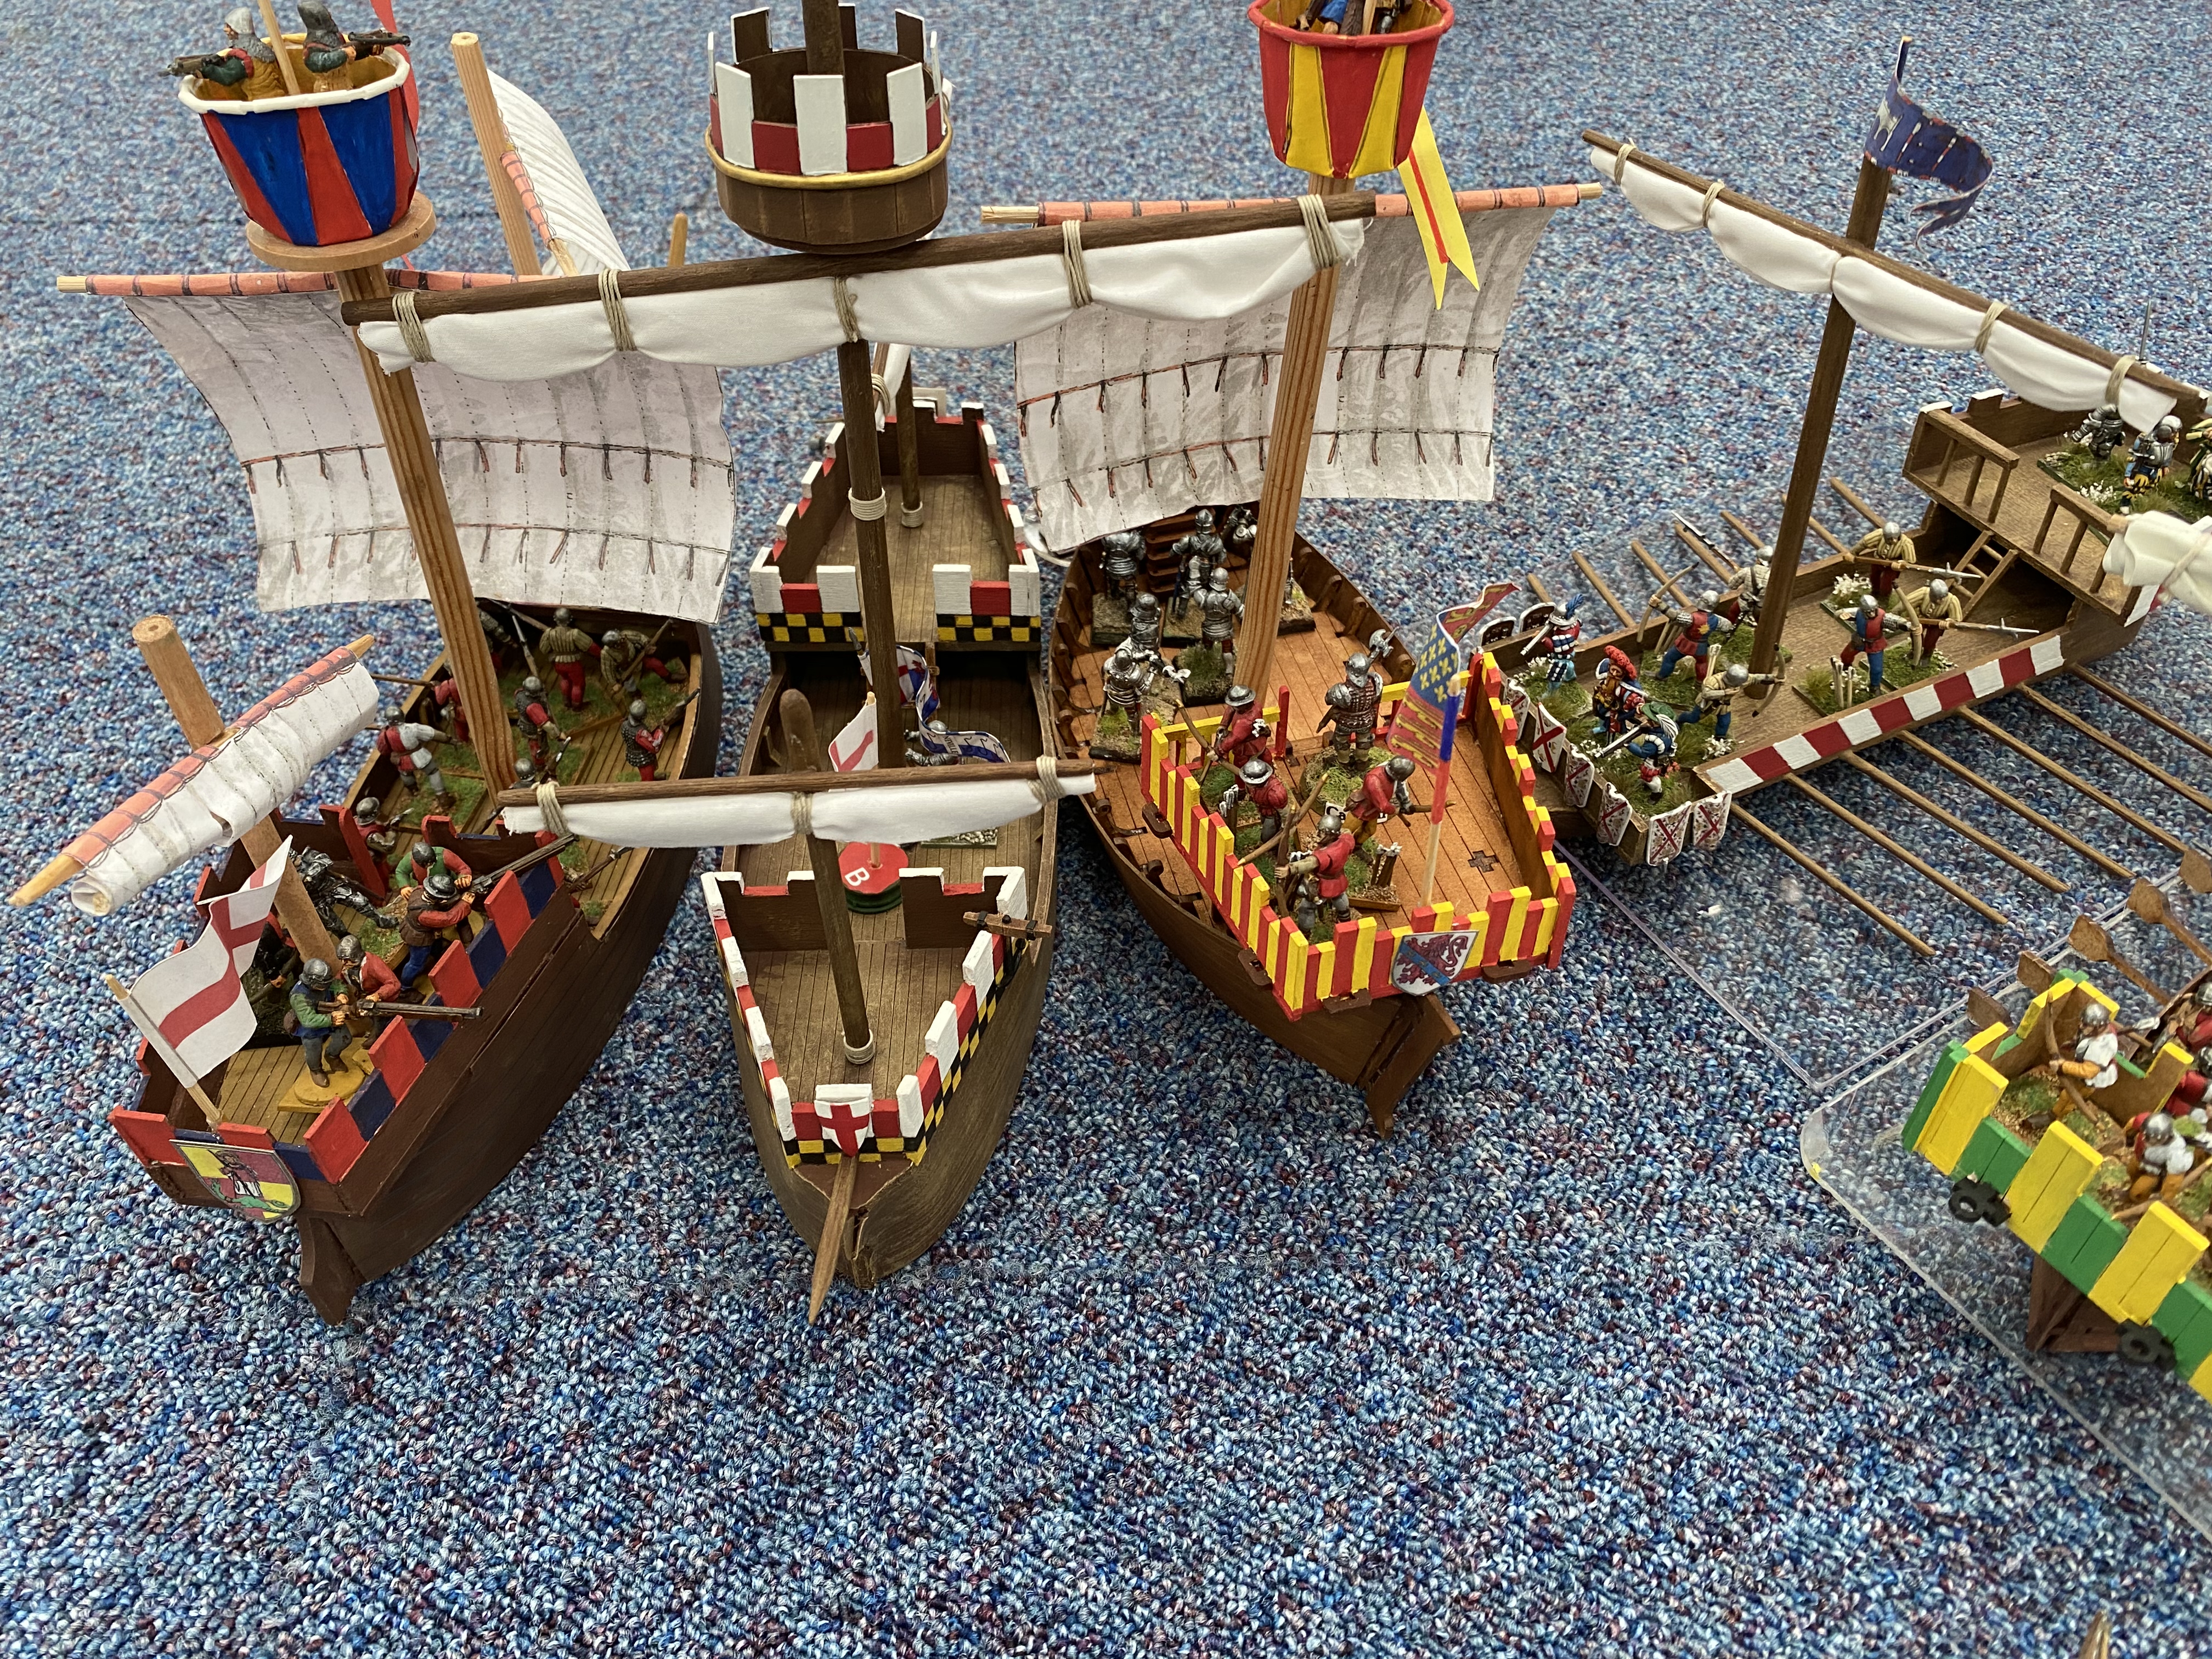
In a new project, I have recently decided to add bespoke ‘crews’ to all of my Medieval Boats for my Never Mind The Boat Hooks games. Driven by my OCD tendencies, I wanted my troops to blend in with the ships decks, rather than have landscaped grass and flowered bases! The original attraction of ‘Boat Hooks’ was that we could use our WOTR troops for both games but seeing my heavily flowered and tufted bases on a ships deck was slightly irritating for me. I also felt that smaller bases would be better for the limited space on the ships decks and in the fighting tops. So, I first mounted the figures on 15mm round bases but then decided that the bases needed some extra weight to keep the figures standing up and so resorted to sticking the figures straight onto 15mm metal washers.
I then decided that it would be useful if I could use my fighting boat crews on land…..as if I needed more troops. Well, I could use them on land if they were on movement trays. So I sent to Warbases for some movement trays with 16mm round cut outs but asked them to make the trays the same size as if they were holding 25mm rounds. The reason for the extra size was to allow me to ‘landscape’ the trays so that the plain bases of the troops would be less obvious.
So, in picture format, here’s how I made the movement trays and how they look!
The top shows the’naked tray’! The bottom two trays have Vallejo paste and stones and ballast added. The first coat of Delhi Bazaar brown emulsion has been applied.The trays have been dry brushed with a mixture of Brown and Iraqi Sand to highlight the texture.Woodland Scenics green scatter added.Various Gamers Grass tufts added – I went for a moorland look.The troops in their new movement tray ready for a land battle.Back on board ship ready to conquer the seven seas…Well, the English Channel for a start!I now have another 24 troops for my army – not that I really needed them but…..
I actually have 60 crew that are now able to fight on land and with another 48 or so to do, I will have a rather formidable army that is able to muster both for land and sea battles.
I hope that the above is helpful to anyone thinking about basing. In the meantime,
I decided to have a break from painting Samurai and instead have a go at some individual models that I had stashed in my desk drawer. I started with a model from the LOTR battle strategy magazine. I have the full set of these magazines and since COVID, I am working my way through the whole collection, painting all of the models that came with the magazines. I have now reached issue 45 and the subject of this magazine was a mounted Captain Faramir in his Men of Gondor armour.
Captain Faramir
He was fairly quick to do but to be honest, I didn’t really enjoy painting him and I’m not entirely satisfied with the result but he’s done and in the cabinet!
A.T.A pilot RAF Winthorpe
The next figure is the free figure given out at Partizan. I have quite a collection of these now and I make a point of always painting the give away figures at any show that I attend now, rather than just putting them in the lead pile to gather dust. The figure represents a female pilot of the Auxiliary Transport flight. A cursory glance on Google showed the flight suit to be a light brown colour, so I used my standard paint scheme for British WW2 uniforms. A triad of Vallejo Burnt Umber, English Uniform and Khaki Grey. I’m quite pleased with this figure although I may have ‘over tufted’ the base!
Lord Percy, Baldrick and Black Adder!
The next three figures were from the company Battle Flag. I had reviewed these for Wargames Illustrated and previously painted the Bishop of Wells from the set. These were a joy to paint and I am quite pleased with the result. In the main, I copied the examples on the Battle Flag web site.
Another view.The rear of the figures
I have vague ambitions of creating an Elizabethan Army to fight against my Irish. If it does happen, these will definitely be my commanders!
Giovanni of the Black Bands
The next figure on the work bench was Giovanni of the Black Bands, a Giants in Miniature figure from Wargames Illustrated. I have a number of the GIM figures but only acquire them if they fit into my various collections. I was tempted to start a sub category and try to collect all of them but the last thing I needed was another distraction from the other projects that I have on the go. In fact I think there is a joke in there regarding sub categories – most wargamers would probably have a U boat collection if they had the space! I digress. Giovanni will be added to my growing Italian Wars collection. His armour looks blacker on the model than in the picture and I decided to paint him with white stockings rather than brown boots as shown in the WI sample.
Blaise De Monluc
Finally, another G.I.M. figure from WI; Blaise De Monluc. Again, I pretty much copied the WI sample but left off the saltire badge which I thought looked too fussy. I had intended to use Blaise as a Captain for one of my Galleys in NMTBoathooks but I forgot that was the case and used a standard basing. He will also be fine for my Italian armies though.
So that’s it for now. I have a few more personalities to complete and then it will be back to more Samurai!
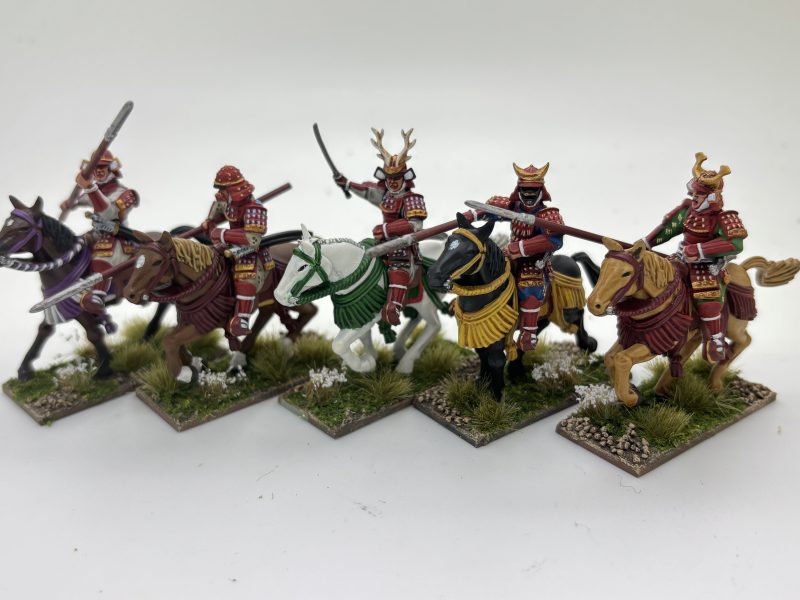
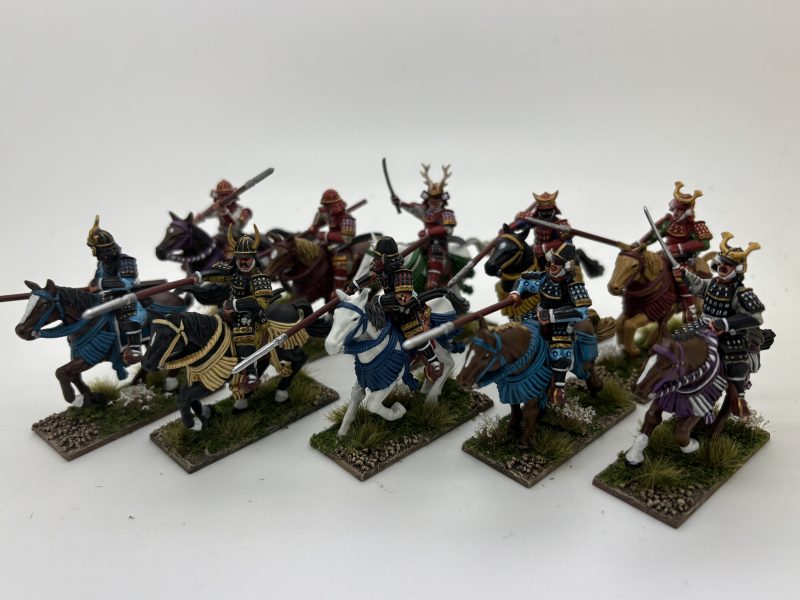
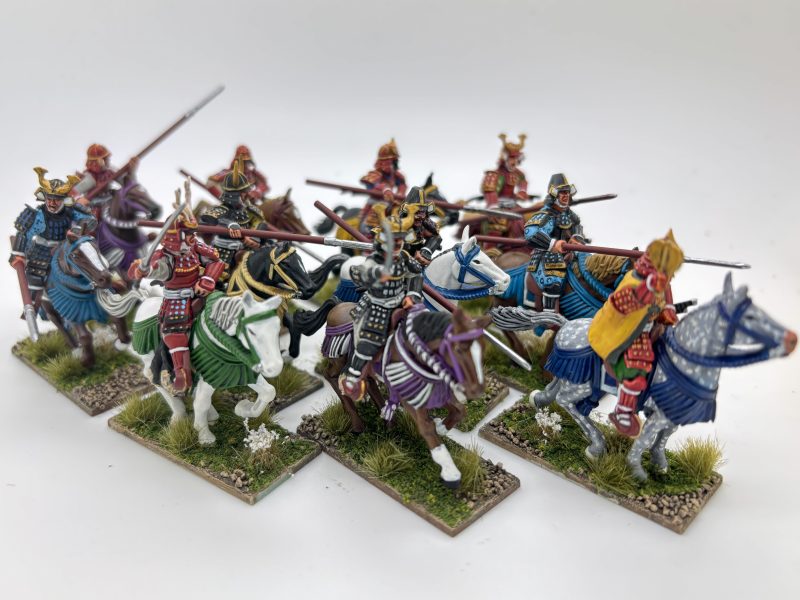
As mentioned on my previous blog post, I have been working on no less than eleven Samurai cavalry figures that will nicely complete my Fireforge Samurai Cavalry units. The nice weather has made it difficult to justify being indoors painting, so these have taken somewhat longer than planned and to be honest, although ready for the table, they are still not finished.
Samurai in Red Armour
The eleven figures were intended to be eight Cavalry for a new unit and three commanders, as I already have two units of cavalry. Three seemed like a nice number! I had also decided to paint four in black armour and four in red armour for no other reason than to give a bit of variety.
Black Armoured Samurai at the front!
I also had some ideas for the commanders. The Samurai were well known for taking heads in battle, so I decided to add a couple of heads, well three in total, to two of the commanders. It’s a bit gruesome but the custom seemed to be that having taken the heads of their opponents, once the battle was over, they would ‘groom’ the heads, mount them on a spiked board and present them to their Daimyo.
The unpainted heads attached to the horses.
To make the heads, I took some spare heads from the Fireforge sprue. The heads without helmets are the obvious choice! And it seemed sensible to use the ones with their mouth open. I then carved the topknots off and used some green stuff to make the hair from which the heads would be attached to the saddles. I guess they probably would have used some sort of the twine or rope but it was easier to model the hair.
Close up of the heads – note green stuff hair!Another close up of the other head!
Once the greenstuff had dried, I painted the hair black and the heads in a light coloured flesh. I used a blue wash to get a more gruesome look. I guess you lose a bit of colour when your head is chopped off!
Finished headsClose up of the painted heads.
I resisted the temptation to have blood splattered over the horses. The idea of taking heads in battle isn’t exclusive to the Japanese but it’s one of their less civilised and gruesome ideas, I think!
Commander with Battle fan.
The third commander is from the Fireforge command set and comes with a cloak, which gave me an excuse to try another experiment. The cloak really needed a fancy design painted onto it but I had seen an idea on Facebook that used a nail art decal to add such a design. Although my free hand is improving, a decal would look better. So I sent for a batch from an online supplier – just search under nail art – the selection is immense!
Yes, I realise that the dragon is probably Chinese but I liked it. I had to cut it to fit but a coat of matt varnish sealed it in place and I think that it is better than anything that I could have painted! I have a whole batch of these to use and I will experiment with them on the Horo that I intend to add to the figures at some point in the future.
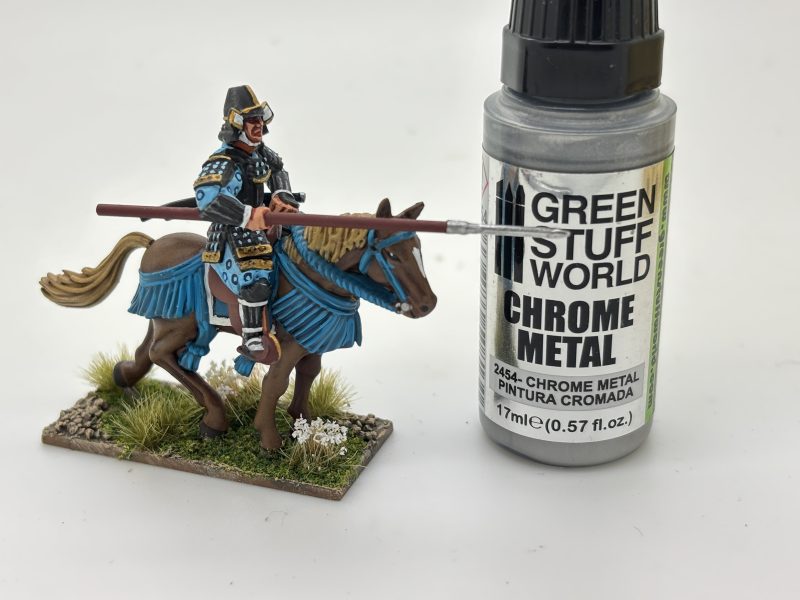
I used the chrome on all the weapons -it really ‘pops’ on the wargames table.
The third experiment or innovation for me was to use a chrome paint on the weapons. I think that this looks particularly good on the Katana, which would be nice and shiny and sharp, ready for cutting off heads…
The finished batch
So, for now my cavalry are complete…except that I will add either Horo or Sashimo to them and I plan to make some special commander bases for use in my new rules set ‘Never Mind The Bushido/Naginatas. However, I need a break from Samurai, so another project beckons!
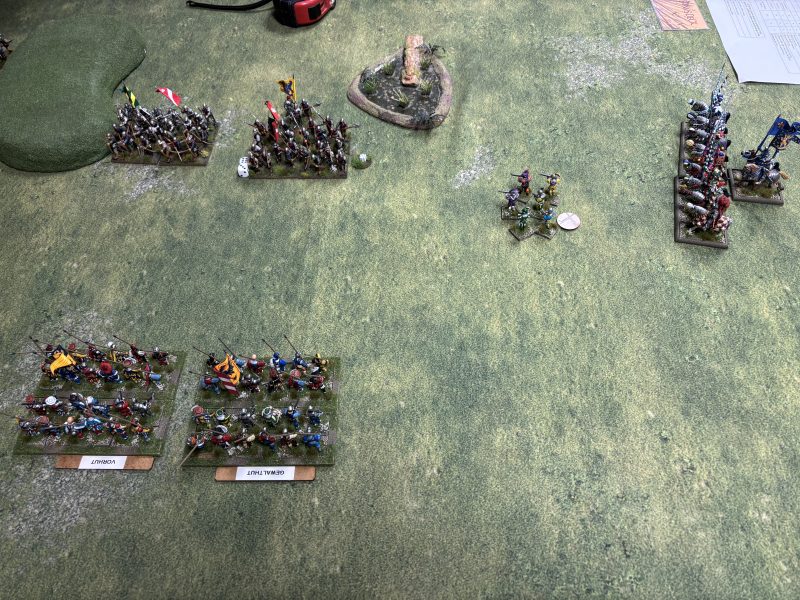
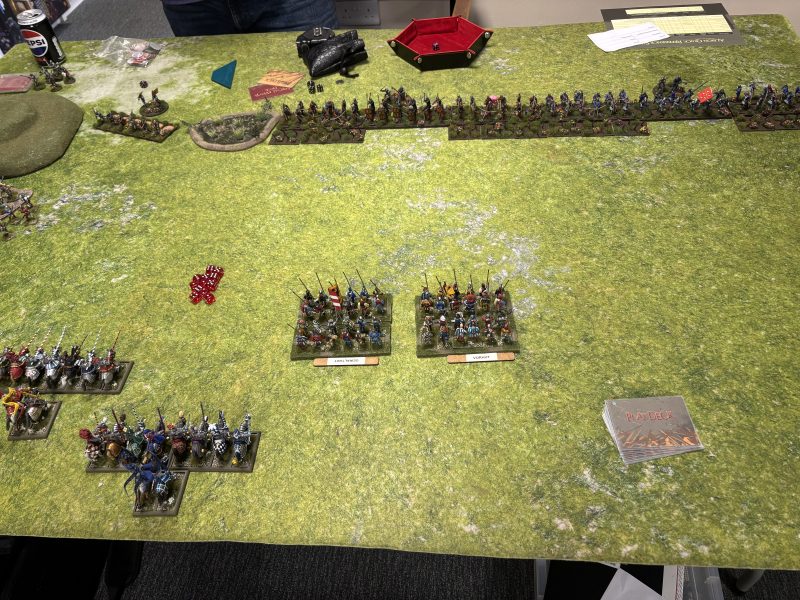
It’s been a really busy gaming period for me. I think that I might have actually spent more time gaming than painting. First up was a trip down to Bristol to take part in the Bristol Independent Gaming Billhooks event. Organised by Mike Peters, this is one of the highlights of the gaming year for me. The event took place on Saturday 26th April but I stayed overnight on the Friday and Saturday. The Friday being the obligatory pre event meal and social.
The army marching to Bristol!
It goes without saying, that Mike and BIG Jim were superb hosts and the event was a fantastic success, extremely well organised and played in a most sportsman like manner. I would recommend that anyone that is interested in the Billhooks rules set and can put together an army attends if possible – they will have a most enjoyable day, win or lose and even if a newcomer, they will find there is a warm and helpful welcome.
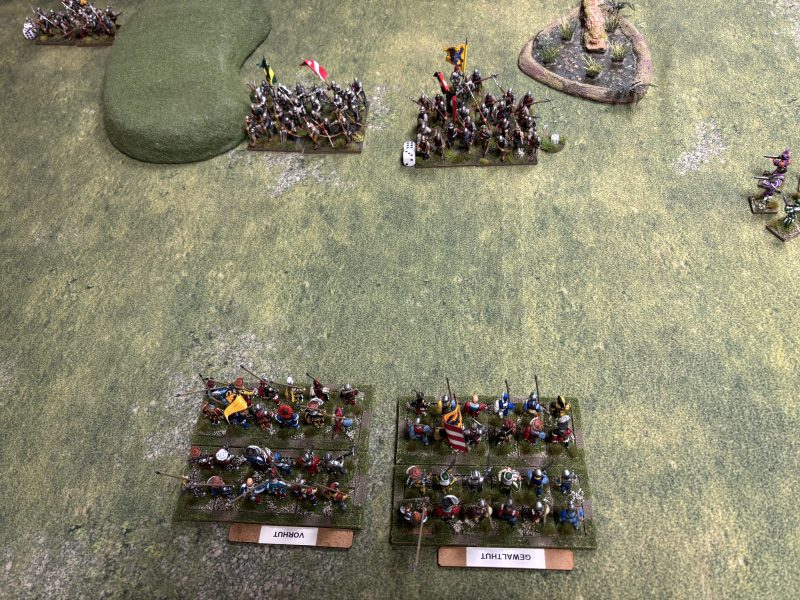
I played in three games on the day. my first was against Tom Farrell’s Lancastrian WOTR army. Tom was fortunate to find all the scenery allocated ( randomly) to his side of the board and no doubt feeling threatened by the quantity of cavalry that he faced, set up a strong defensive position.
I decided to focus on the flanks and succeeded in driving off his cavalry early in the game. My Stradiots also threatened his weaker ward on my left flank. After weakening this ward, for the loss of my Stradiots, I daunted the two units, destroying the archers. However, the Billmen were able to rally, something that would come back to haunt me!
Landsknechts to the attack.
I still needed to break the Lancastrian centre, a tough nut to crack, particularly as one block had MAA supporting the archers and both flanks were defended by the terrain.
The Landsknechts approach – can you spot the unit of Billmen in the far left flank….
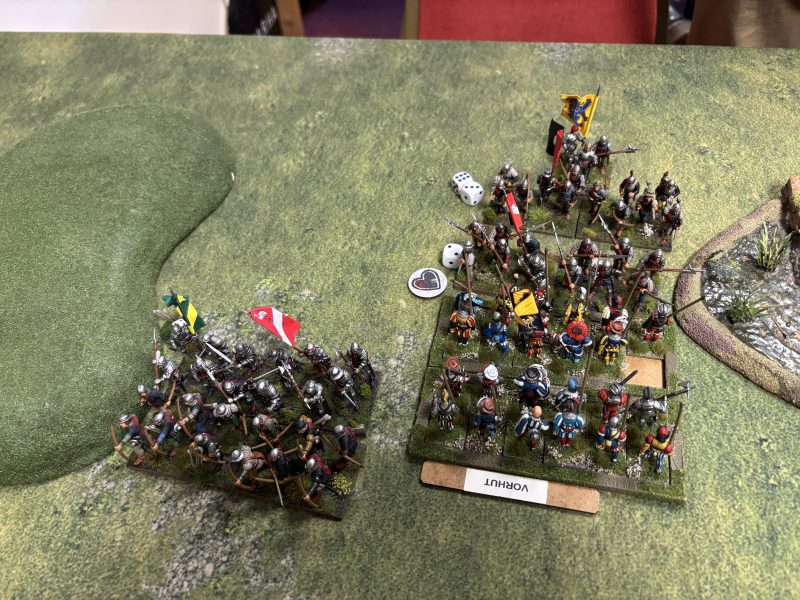
The Landsknechts gained an early victory, daunting the Billmen in the first block but the failure to rout these units resulted in the Landsknechts eventually being pushed back. Once again, Tom was able to rally a daunted unit, recovering a morale token. It was down to the wire with morale tokens short on each side but Tom drew a second special event that enabled him to launch a flank attack with his recently rallied Billmen from the left flank. It was game over for me as another four morale tokens were required as the Landsknechts routed!
Push hard boys! you can do it!
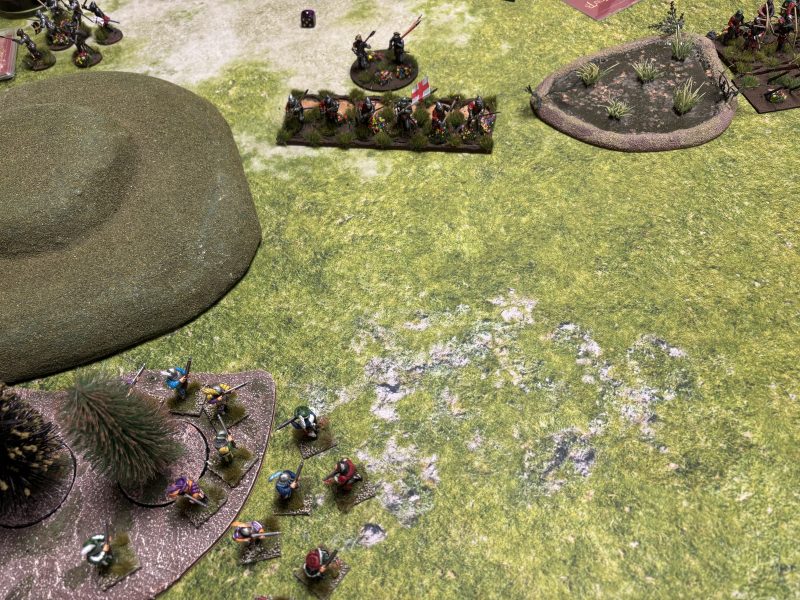
Next up was Nathan McGowans 100 year war English archer army. I was initially perplexed as to how I would deal with the firepower from the massed bowmen, protected behind their barricade of stakes.
How do we get through that defence?
Once again, Nathan had the advantage of terrain and advanced to plant his stakes, with his flanks protected by the board edge and a pond. There was no way that I would attempt a frontal assault, the stakes would cause disarray in any attacking unit. I would have to find another way in.
My gunsmen soften up the MAA!
The left flank was being protected by a tough looking unit of MAA. They would need some softening up before I attacked them. Step forward the Landsknecht gunners! They were devastatingly accurate with their fire and soon forced a morale check on the hapless MAA. The door was open!
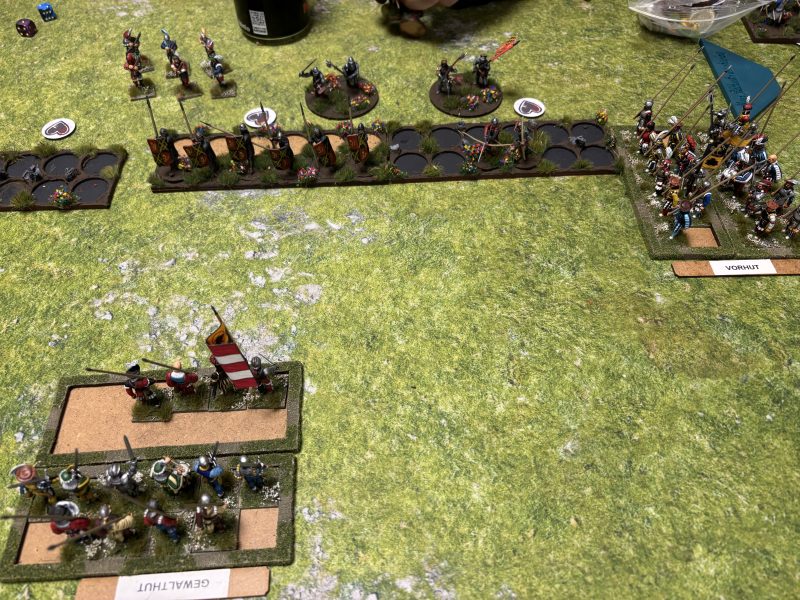
You’re surrounded! Give up!
Nathan was forced to pull up his stakes and try to redeploy as my Stradiots and cavalry threatened the rear of his line.
The Line crumbles under assault!
With his defence now in tatters, my army was able to get into the archers and before long, they were routed. A victory for the French!
So with one win and one loss, it was onto the final game against Steve Coopers Lancastrians. Alas, I have no pictures of this game. I had begun to run out of steam, with the long drive down to Bristol, a late night, a reasonable intake of alcohol and the emotion of the two previous games, it was all I could do to try and focus on the game. It was another very tight game in which I lost, remembered that my Leader had a re-roll, nearly won, then remembered that Steve’s leader had a reroll before losing once again! This was a tough, close match with, I think just one morale token in it, Steve’s light Cavalry getting their revenge for being almost harried off the table with a final successful flank charge. I had the feeling that my luck was draining when 12 of Steve’s archers managed 6 long range hits from 12 dice, only for me to fail 5 saves…Ah well, that’s Bill Hooks for you! Never mind, there’s always next time!
I did have a very nice consolation prize at the end of the day though. My army was voted the ‘Best Painted Army’ so I was very pleased to have my work acknowledged by my peers, particularly as the competition was very strong, with some beautifully painted and detailed armies on display. Incidentally, if you would like some details of how I painted my gendarmes, check out my earlier blogs:
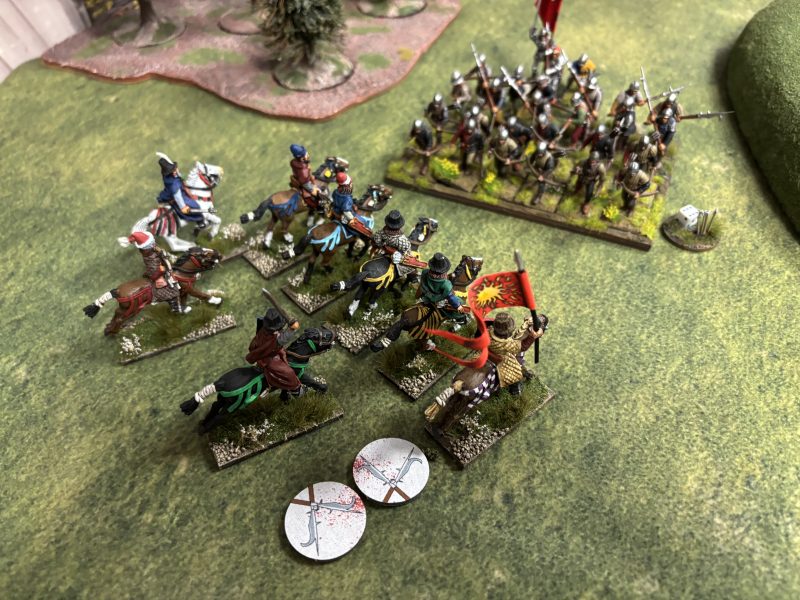
As for the rest of my gaming activity, I filled the following weekend gaming at Andy’s house. Friday night was a big Crusader game using the latest Bill Hooks adaption – still being play tested with Saturday being spent playing a big Samurai game. Phew! I’m nearly gamed out! You can read all about the Crusader game on the Bill Hooks Facebook group here:
Finally, although gaming has dominated my hobby time, I do have 11 Samurai cavalry on the go! Here’s a picture of the horses – I hope to write a blog showing them completed in the near future!
Samurai horses waiting for their mounts!
As always, I hope that you enjoy your hobby as much as I do!
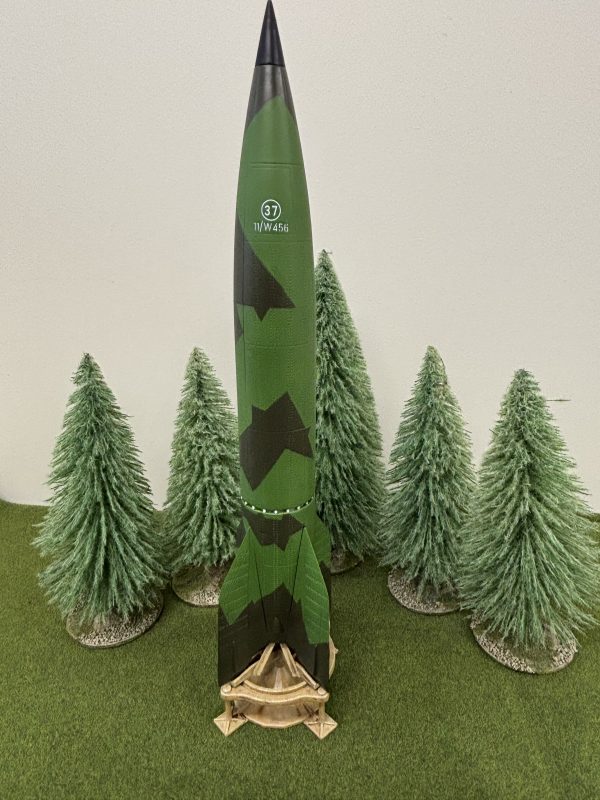
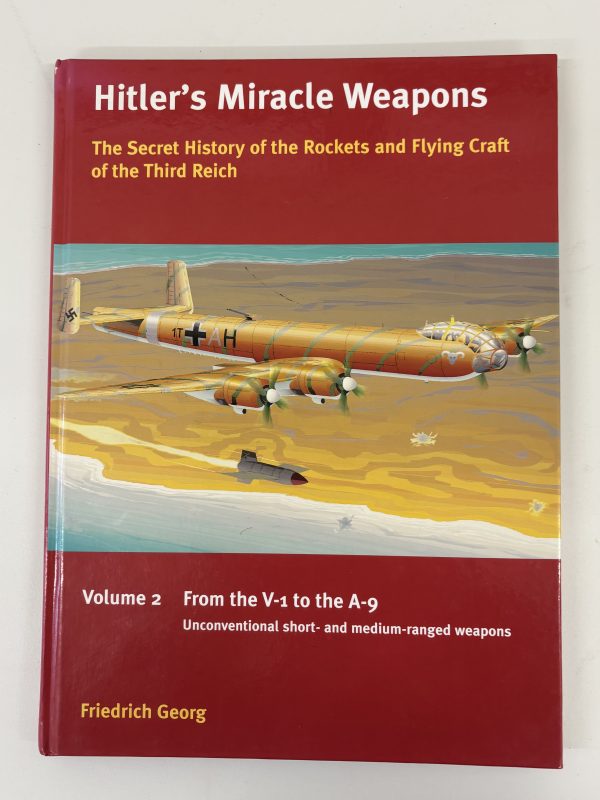
A somewhat different subject to my Samurai collection this week! I needed a break from painting Samurai figures and so switched to another of my interests, building 1/48th scale kits. I intend to build a collection of both 1/48th scale tanks and AFV’s that have served in the British army, primarily to go with my wargaming collection. Although my wargames figures are 28mm and in theory, 1/56th scale, once based, they look more at home with 1/48th vehicles in my opinion. Of course, once I had built and painted a few tanks, I soon became attracted to the other possibilities available. I have now got a number of aircraft kits in my stash to be built one day – Spitfire, Lancaster, Fockewulfe and Beaufighter for starters! As well as these subjects I have also been long fascinated by the Nazi Super weapons of World War two. I have already built the Tamiya 1/48th scale V1 and I had in my stash a Pegasus 1/48th scale V2.
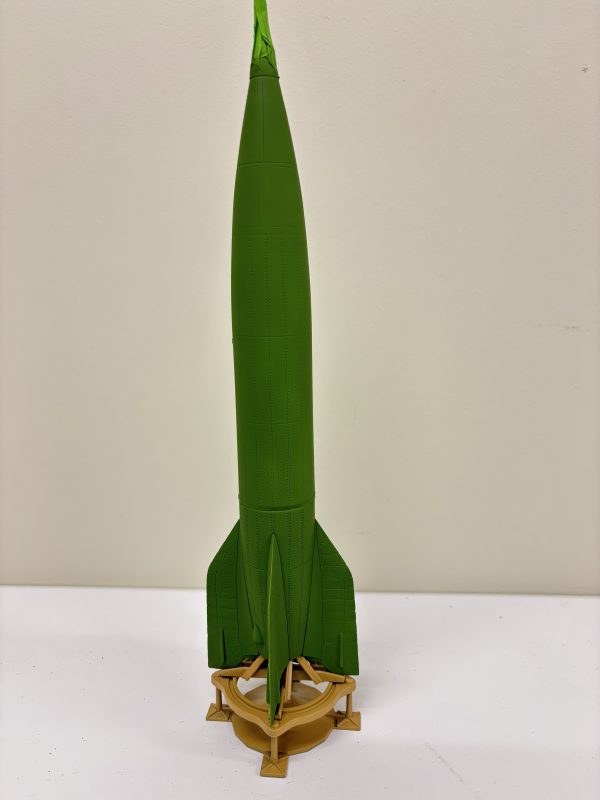
The Pegasus kit of the German V2 rocket
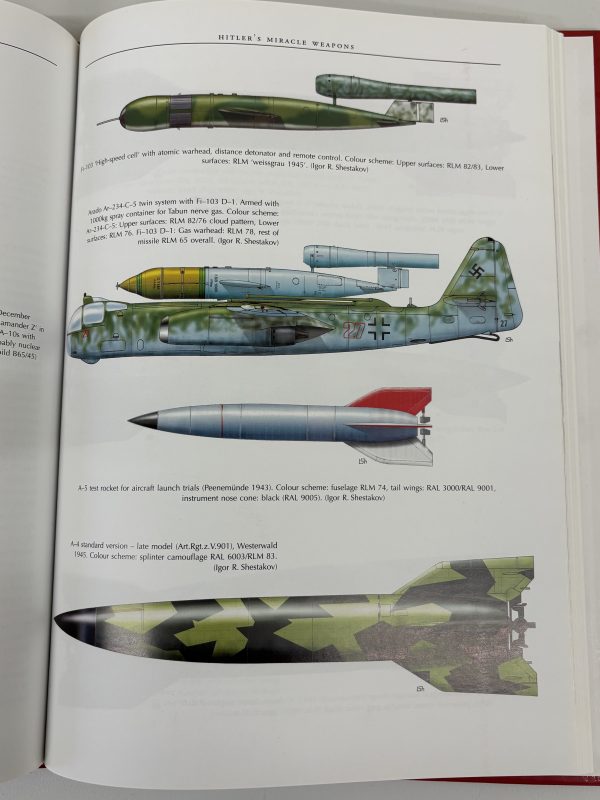
The kit was actually a clip together model and I wasn’t sure how it would go together. In the event, it was a joy to snap together, everything seemed to fit without a problem and there was very little scraping or filling that was required. The next stage was to paint it. I didn’t like the scheme shown on the box but instead went for a colour scheme that I had seen in one of my reference books. The image on the bottom right is the one that I based my colour scheme on.
I used this book as research.
Once I had primed the model, I then used my airbrush to spray it in Vallejo 70922 uniform green for the base coat.
Base coat sprayed on. Note launching pad painted with German yellow.
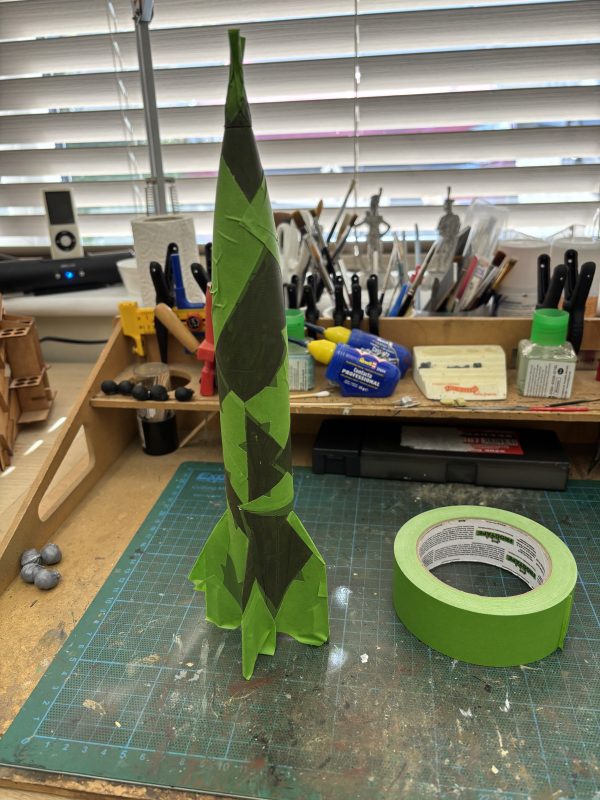
My first attempt at masking the base coat off to get the splinter pattern camouflage ended in disaster! I used Tamiya thin flexible masking tape to ‘draw’ the camouflage design onto the model and the attempted to brush paint it with the contrasting colour, Model Air 71011 Dark green. What a mess! After some thought I resorted to using Frog tape to mask off larger areas so that I could re spray the Dark Green.
V2 now masked off with frog tape – note the cut outs
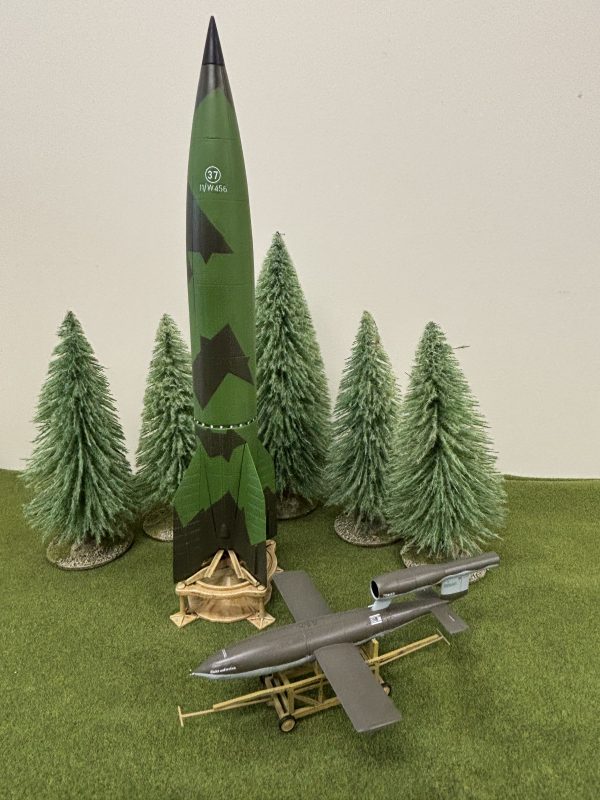
The frog tape was excellent for the purpose and I used a scalpel to make some cut outs to add to the detail of the splinter camouflage pattern. Once I was happy with the result, I sprayed the nose cone matt black, added the decals and then gave the model a coat of satin varnish
The finished model
It’s fair to say that the decal is probably incorrect but looks good on the finished model. These days I am only interested in making a good representation of the subject rather than an IPMS standard model! I’m not entirely happy with the launch pad. I initially sprayed it in a desert yellow but I have then weathered it to a lighter colour. I’m not sure whether the launch pad was reused or was a one off item and I ended up with neither a pristine new pad or a well used one! Oh well! It looks good enough!
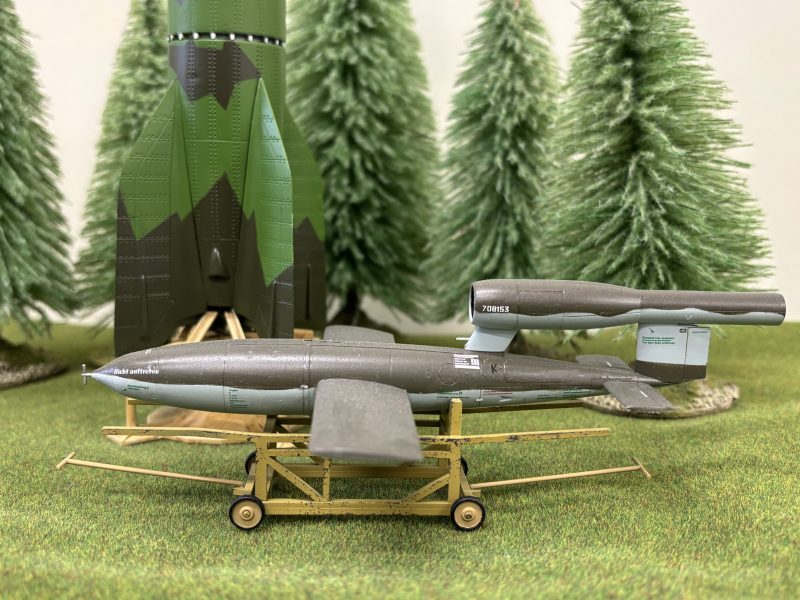
Here is the V2 along with a V1
I now have both of the main V weapons in my cabinet. I would love to add some of the German Rocket fighters and Jets at some stage but they will have to wait in the queue!
Another shot of the V1 with the V2 in the background.
So now it’s back to Samurai – I have 11 cavalry models to make and paint!
As always, Happy Modelling!
This website uses cookies to improve your experience. We'll assume you're ok with this, but you can opt-out if you wish.AcceptRead More
Privacy & Cookies Policy
Privacy Overview
This website uses cookies to improve your experience while you navigate through the website. Out of these cookies, the cookies that are categorized as necessary are stored on your browser as they are as essential for the working of basic functionalities of the website. We also use third-party cookies that help us analyze and understand how you use this website. These cookies will be stored in your browser only with your consent. You also have the option to opt-out of these cookies. But opting out of some of these cookies may have an effect on your browsing experience.
Necessary cookies are absolutely essential for the website to function properly. This category only includes cookies that ensures basic functionalities and security features of the website. These cookies do not store any personal information.